Color Coding
In electrical diagrams, this book uses the same wire color coding
scheme as Jaguar uses in their manuals. If two colors are indicated,
the first is the base and the second is the stripe. If three are
indicated, the third is a spiral stripe. The color codes are as
follows:
N - browN (NOT neutral!) - usually 12V power
B - Black -- usually ground
U - blUe
K - pinK
S - Slate (British for gray)
G - Green
Y - Yellow
O - Orange
R - Red
W - White
P - Purple
Jaguar also throws an L in occasionally to indicate a Light color.
Optical Fibers
If the wire is solid dark gray, it may not be a wire; it might be
an optical fiber. Illumination of the air conditioning control panel
is via a single light bulb in a housing in the console, with the
light carried by fibers to the various locations. This makes the
whole panel dark with a single bulb failure, but it's a cinch to
replace the bulb; just remove the top cover of the console (3 screws)
and replace the bulb inside the housing.
Don't cut those fibers; they're not easy to splice. They are a
little brittle, so don't bend them too sharply either. They tend to
get in the way when working on the radio, so be careful.
If you need to disconnect one from the fixture at either end,
don't just yank. Insert a tiny screwdriver into the slot along the
side of the socket and twist to spread it a little, and the fiber
will come out easily. It has a little brass fitting on it with a lip.
To put it back, simply press it in until it clicks.
Note that the sockets on the bulb housing are not all the same. If
you open it up and look inside, you will note that some of the
sockets feature a colored filter. Which socket used will determine
what color light comes out the end of the fiber.
If you need to try to splice a fiber, Don Mathis of the Lightguide
Media Department at AT&T Bell Labs says: cut the ends of your
plastic fibers with a razor blade. This should give a very smooth
cut. You need to butt the two fibers together while you epoxy them in
that position. A "Vgroove" works well. If you come up with a means of
clamping the two fibers together mechanically, index match grease
between the ends helps to decrease the loss. Silicone grease, clear,
works well. Vaseline is not bad either.
If all else fails, Edmund Scientific has the fiber for
approximately $0.70 per foot for 0.040" diameter. You can also get
genuine Jaguar fibers from several mail order outfits, but they
aren't cheap.
Wire Splicing
Making durable, reliable wire splices is essential to working on a
Jaguar; there are a great many electrical circuits, they tend to be
rather complicated, and the Lucas components cause enough trouble.
When troubleshooting, it is important to be able to eliminate a
previously-made splice as a possible cause.
First, it is helpful to have a pair of wire-stripping pliers
around -- a good pair. A good wire stripper will remove
insulation from the tip of a wire neatly, doing much less damage to
the conductors than you can do with a razor blade, or your teeth, or
whatever. However, a cheap wire stripper, especially one in which the
stripping slots don't line up properly or are not sharp enough, can
cut half the copper strands while removing the insulation.
When splicing wires together, the best way is to solder them -- if
they won't be exposed to a great deal of heat, which may melt the
solder. A soldering gun of about 140W capacity is recommended;
soldering irons are intended for circuit board work, and do not work
well doing wire splicing. On larger wires, an iron may not provide
enough heat to make a secure connection. And, the intermittent nature
of wiring harness repair makes the instant heating of the soldering
gun a big help. Even the little light bulbs usually found on
soldering guns tend to be helpful in automotive work.
If your soldering gun isn't heating like it should, loosen the
nuts holding the tip and retighten securely. These are electrical
connections (a soldering gun is a transformer that provides low
voltage and high current through the tip to heat it), and they need
to be tight.
Regardless of whether the solder used says "resin core", you
should use a separate tin of resin flux. The first time you use it,
you will know why this is recommended; relying on the resin in the
solder doesn't work nearly as well. Do not use an acid flux; it is
intended for copper pipe connections, not electrical work. And,
before doing any soldering, always dip the tip of the gun in the flux
and apply a little solder to the tip as it heats up.
Another workable splicing method, and the method to use when
exposure to heat is a factor, is to use a crimp connector. If the
crimp connector is the uninsulated variety, it may be possible to
combine methods; crimp the connector to the wires, and then apply
solder.
Crimp connectors can be purchased in automotive stores, often in a
package along with other types of crimp-on terminals. Some of the
terminals will have a built-in piece of insulation, while others are
bare. Keeping a selection on hand is a must.
Most of the available electrical connectors work well, but there
are a couple specific types to avoid. One to avoid is a tap connector
that consists of a plastic device than is placed over an existing
wire, a new wire is put in place alongside it, a metal connector is
squeezed into place with a pair of pliers, and a cover is folded over
and snapped in place. While slick, this connector makes weak and
unreliable connections, especially on unusual wire sizes.
Where possible, avoid the use of electrical tape. With age, it
tends to harden, while the adhesive gets gooey. After some time, tape
on connections can be found to have fallen off or slid up the wire,
leaving the conductor exposed. If electrical tape must be used, it
should ideally be stretched a little as it's applied; the stretch
will pull it tightly around the conductors, helping prevent its
coming loose anytime soon.
Please don't use friction tape. Electrical tape is solid plastic,
while friction tape is black cloth. Friction tape is not intended for
electrical work.
The best insulation method to use is heat-shrink tubing.
Heat-shrink tubing is available at some auto supply stores, but the
best place to buy it is at an electronics store. At the better
electronics stores it can be purchased in 4-foot lengths and in a
great variety of sizes. It also comes in various colors, including
near-transparent.
Select a size of heat-shrink tubing slightly larger than the
insulated wire, and cut a piece a little longer than your splice will
be. Slide this piece onto one of the wires before you connect the
wires together. After soldering, slide the tubing over the connection
and use a cigarette lighter or match to shrink it down snugly.
Heat-shrink tubing also works well on many terminals. If you
select tubing barely large enough to fit over a female spade terminal
and shrink it in place, it makes an excellent cover. And a smaller
piece of tubing will work well to cover the crimp connection on
terminals that don't come with built-in insulation.
Connectors
Since the basic wiring connectors themselves are among the worst
features of Lucas engineering, it is recommended that the owner keep
a supply of Molex connectors (such as those sold at Radio Shack) on
hand. When a connector is intermittent or is otherwise causing
trouble, don't try to clean it up; simply cut the sucker off and
install a suitable Molex connector in its place.
Some hardware or building supply stores carry a substance for
preventing oxidation and corrosion of electrical connections. One
such substance is called Ox-Gard, by Gardner Bender Inc. of
Milwaukee; it comes in a 1 oz. tube and has the consistency of
grease. Since Jag electrical connections tend to corrode, it is
suggested the owner keep a tube of this stuff around and use it. The
first place to apply it is on both ends of each fuse you can find.
Vince Chrzanowski of Baltic, CT restores old auto radios for a
living. He recommends Channel Master COLOR contact Shield,
Silicone Base, which is available at most electronic supply houses.
Model 9101 is the 16-oz. can; model 9100 is a 6-oz. can of the same
stuff. He claims many rocker switches, even many of those that appear
to be broken, can be fixed by spraying this stuff through the cracks
without even removing the switch from the panel! He recommends it be
used on all connections, fuse blocks, switches, etc.
EFI Connectors
The connectors that snap onto the fuel injectors and the
temperature sensors are rectangular, hard, and have an external
spring to provide snappage. These connectors, used on Bosch and Lucas
systems worldwide, are common enough that replacement connectors are
available.
Wiring Harness Renovation
Richard O. Lindsay sends this innovative method:
Tie the harness into position with tiewraps thereby preserving
all of the original bends and more importantly, breakout points.
Remove all of the jacket leaving the wires only in position. This is
a good time to clean and degrease all of the insulation. Then cut
each wire, one at a time, about a foot or so back from the connector
end. This cut should be well back into the jacket away from the
breakout point. This allows you to splice in a piece of generic wire
of the appropriate gauge and turn the original cut off wire around
leaving the nice clean colorcorrect wire sticking out. The addition
of a correct connector makes for a functional harness that, when
vinyl wrapped, will look new and be color code correct!
Dave Covert sends the following:
The cloth cover is not something you can really buy, but must
send your harness to a shop and have it wrapped. The shop has a
braiding machine that weaves 32(?) strands of cotton thread around
the bundle. Sixteen strands in a clockwise direction, sixteen strands
in a counterclockwise direction. The cotton strands are usually
black, but if your original harness had a colored tracer thread(s),
send a sample along with the harness and the shop will switch some of
the 32 strands out for colored strands to match the original tracer.
The shop will also want you to mock up your harness with a few pieces
of electrical tape to hold it in the proper shape.
Cost is modest, and varies a bit from shop to shop. I had good
conversations with two different shops, each with different pricing
schemes. The first shop was
ClassTech of Bend, Oregon,
1-800-8749981. The second shop was Harnesses Unlimited of Oreland,
PA, (610) 6883998.
If a complete rewrap isn't called for, Bruce Snyder sends these
suggestions:
I've had a lot of success with the large sizes of heatshrink
tubing available at electronics suppliers. It's available in long
lengths and a large variety of diameters, and looks quite nice when
installed. Of course, you have to be able to slip it over the wires.
The other thing that has worked well for me is the dry vinyl and
cloth wrapping tape from Eastwood, and the cold shrink tape. These
work very well, and have no adhesive to make that sticky mess we all
love so well. These all take a little time to install, but look good,
are durable, are considerable cheaper than a new harness and don't
involve extricating the old harness for rewrapping.
Fuses
The UK uses a different definition of the rating for fuses than
the U.S. does. The U.S. rating is for how much current the fuse will
carry without blowing; the UK rating is for the amount of current to
blow the fuse within a certain time. Simon S. Johnson sends the
following data: "...the source: a 1974 edition of "Buss Fuse Car and
Truck List" which has on the back cover a section call "Foreign Car
Fuse Replacement Data," -- foreign to the U.S., that is. It states
that "English standards differ from U.S. standards. This accounts for
difference in ampere ratings." Then it provides a list:
|
Englist Type
|
Buss Replacement
|
|
50 amp
|
AGC 30
|
|
35 amp
|
AGC 25
|
|
30 amp
|
AGC 20
|
|
25 amp
|
AGC 15
|
|
20 amp
|
AGC 10
|
|
10 amp
|
AGC 7.5
|
|
5 amp
|
AGC 3
|
Relays
There are relays all over the XJ-S. Most are a Bosch 12V 30A SPST
relay, and are a small metal box with spade connectors labeled 30/51,
85, 86, and 87. 85 and 86 are the coil connections, 30/51 is the
common contact, and 87 is the Normally Open (NO) contact.
These relays conform to a standard, and are readily available at
any auto parts store. Often, the aftermarket relays are labeled for
use in controlling driving lights, and may be found among the driving
light kits instead of under general electrical components. They are
usually entirely black plastic, and they often have an integral
mounting lug. And of course, any aftermarket electrical device is
likely to be as good or better than a British original.
Some of these relays (and apparently ALL of
the aftermarket generic equivalents) have a second connector 87 in
the center of the base. This connector is connected internally with
the first 87, regardless of relay operation; it merely serves as a
second connector to the same terminal. In most cases, a relay with
the extra spade connector can be used to replace a relay with only
one 87, as the socket or plug will have a hole or slot for the unused
spade to protrude through. However, one should be careful about
replacing a relay with two connectors with a relay having only one;
the socket may have a wire that connects to this spade, and will not
be connected if it is not there. At this point, the solution is
usually a simple matter of trading one relay with another to get a
relay having both connectors where it is needed.
Radiator Fan Relay
A notable exception to all of the above is the radiator fan relay,
SRB411. This relay has the exact same layout of spade connectors on
the bottom, except that the connector in the center is labeled 87a.
This relay is bright red -- Lucas' way of indicating "Hey, dummy,
this relay is DIFFERENT!" (any intelligent
design would have had a completely different spade connector layout
to prevent any possibility of confusion, but remember -- this is
Lucas we're talking about). A close inspection of the schematic on
the housing shows that this is in fact a SPDT relay, and the 87a is a
Normally Closed (NC) contact.
Worse, in this particular application the 87 contact is 12V power
and the 87a contact is connected directly to ground. As a result, if
a normal relay with two 87 connectors is plugged in, a direct short
will result and fuse #1 in the headlamp fusebox will blow
immediately.
The NC contact shorts the fan motor to ground when not operating.
It's not known why Jaguar did this. If a normal relay that has no
center spade terminal is installed, the system seems to work fine;
the fan operates normally when on, and the fact that the fan is not
grounded when off doesn't seem to make any noticeable difference.
However, it seems unlikely that Jaguar would have gone to the effort
of supplying the special relay without a good reason.
Even though a generic driving light relay won't serve here,
finding a 12V 30A SPDT relay is usually not difficult. If you don't
wish to buy the Lucas original, you can look for a Bosch, Hella, or
Potter & Brumfield. Per Bob Whiles, the part number for the Bosch
is 0.332.204.105 and for the Potter & Brumfield is VF445F11. Per
Volker Nadenau, the Hella part number is 4RD003 52013. "It fits
without any modifications in the red Lucas socket."
Or, you can go to an electronics store and buy a generic "ice
cube" 12VDC 30A SPDT (or DPDT, 3PDT, 4PDT, etc.) and solder short
jumper wires to suitable spade connectors to plug into the original
socket. If you get extra contacts, just wire them all up to provide
extra current capacity.
Electric Fan Diode Pack
Yet another exception to the typical relay described above is the
blue item mounted on the top left side of the engine compartment just
rearward of the diagonal strut. It looks like a standard relay, and
has the same spade connector layout as a standard relay, but it's not
a relay at all; it's the diode pack for the electric fan. The
terminals are numbered simply 1, 2, 3, 4, and 5. You can easily pry
the box open with a small screwdriver and inspect the layout inside.
Diodes merely allow current in one direction only. When testing
this pack, you should be able to get current to flow from terminal 3
to terminal 1 but not the other way around. You should also be able
to get current to flow from terminal 5 to terminal 4 and from
terminal 2 to terminal 4, but not the other way on either. This
description uses the accepted definition of current as flowing "from"
a + terminal to a terminal. Note that some meters may not incite a
diode to flow in EITHER direction when set to
a standard ohmmeter setting; if the meter does not have a setting for
testing diodes, it might be better to use a light bulb to test.
If any of the diodes prove bad, it's not rocket science to replace
them individually. Suitable diodes are available at any electronics
supply store.
In case you haven't developed a healthy disrespect for Lucas
engineering yet, here's another example of their handiwork: the wires
that connect to terminals 1 and 3 are both GN, but they are different
and you'd better not mix them up! Likewise, the wires that connect to
terminals 2 and 4 are both LG, but don't mix those up either!
If you've already disconnected them and gotten confused: on the
author's 1983 XJ-S, the GN wire that connects to terminal 1 is
actually two wires connected to the same spade connector, while the
GN that connects to terminal 3 is a single wire. Likewise, the LG
wire that connects to terminal 2 is actually a pair of wires, while
the LG that connects to terminal 4 is a single wire. Here's hoping
other cars are the same!
I will describe more elaborate tests, in case the above proves
inadequate. If you apply 12V to a GN wire and the fan starts running,
that wire connects to terminal 1. If the clutch on the A/C compressor
engages, it connects to terminal 3. If the engine is cold and you
turn the ignition on and read 12V at a LG wire, it connects to
terminal 2; if not either a fuse is blown or it connects to terminal
4.
Starter Relay
Dick Broxon of Cincinnati reports that his 1988 XJ-S would fail to
start on damp mornings. It wouldn't even turn over, it would just
click. It would start later, though, when things had warmed up and
dried out. He removed the plastic cover from the relays under the
hood on the right fender and sprayed them with a product called WIRE DRYER by Snap. He has not had a problem
since.
The starter relay, of course, is under the cover mentioned. It
carries more current than most relays, and a little moisture or
corrosion is likely to cause the starter solenoid to fail to move.
Starter
Greg Meboe and Michael Neal report that Jaguar provided a new
design starter beginning in 1988 that features a gear reduction
drive. This starter will fit earlier V-12's, and is smaller, lighter,
more reliable, and just all-around better.
Alternator
The experts advise that if there is any indication that your
alternator is having trouble (not charging, low voltage, etc.) that
you have it attended to immediately. If caught soon enough, it can be
repaired or rebuilt. If left alone, it self-destructs and a new one
is required.
Reportedly, one indication your alternator has had it is that the
alternator warning light stays on after the engine is shut off.
One bit of good news: If the alternator seems to be charging
intermittently (fully charging one minute, discharging the next as
indicated by the voltage gauge) or has simply stopped charging but
has no shorts or burnt wiring, it might be fixable by replacing just
the regulator itself. This is much cheaper than replacing the whole
alternator, and is easy to do by removing the plastic cover from the
back of the alternator.
Substitues
A replacement Lucas or Bosch alternator is quite expensive, but a
bolt-in substitute apparently does not exist; the mount scheme is
different than GM alternators, a Chrysler alternator won't come close
to fitting in the space, and several Japanese units will bolt up but
the belt will be misaligned. Of course, another possibility involves
making an entirely new mount to fit whatever alternator is available.
Any 12volt internal-regulator alternator of comparable or greater
amperage would serve if it could be mounted. However, the mount on
the engine is rather convoluted and is involved in mounting the air
pump as well, so it is no easy task to fashion a replacement. Note
that the cost of a new Lucas alternator would pay for a GM alternator
and a very expensive custom-made bracket, and the next
replacement would be cheap.
John's Cars reportedly offers a bracket to fit a GM alternator,
complete with a suitable wiring connector.
Beginning with engine #8S57572, the series of Lucas alternators
was replaced with a Bosch 115-amp unit. According to the Special
Interest Car Parts catalog, the alternator mount bracket EAC4181 was
replaced with EAC9320 at the same time. Perhaps the purchase of this
bracket will permit the upgrade of the earlier cars to the Bosch
unit. Since they all use internal regulators, the wiring connections
should be fairly straightforward.
Also note that there are reports of Motorola alternators that fit
this car, and possibly even fitted from the factory. Bob Johnson says
the number is A5000/12.
If removal of the air injection system is a viable possibility,
you might consider the procedure described in
Engine Modifications.
Alternator Load Dump
Module
Reportedly, the 115 amp alternators fitted to the late 1980's XJ-S
will not begin to charge until the engine has been revved up.
Although not really a problem, it is somewhat irritating to see the
charge light on when everything else seems OK.
According to Michael Neal:
Actually, there is a fix for this. There is a device called an
alternator load dump module that was fitted to the later XJ40's and
XJ-S's with the high output alternator. Fitting the module will fix
the problem. The load dump module will cause the alternator output to
function properly at idle without having to raise the idle speed.
The part number for the 115 Amp dump module is DBC 5896.
Electric Cooling Fan
Yes, it's atrociously expensive. But it doesn't do anything any
other 12V, 11" diameter electric fan won't do; substitutions are in
order. A Subaru fan will work with minor blade trimming and a
homemade mounting adapter plate. The bad news is that a Subaru fan
ain't cheap either, but at least it can be found in a common
junkyard. An aftermarket 11" fan (perhaps J. C. Whitney cat. no.
38-3020A, US$57.98) could also be used with a little ingenuity. Be
sure to include a system of rubber mounts, similar to the Jag
originals, to minimize noise.
Better yet, ditch the electric and belt-driven fans and install
two large electric
fans in front of the radiator.
The stock wiring system for the small electric fan incorporates a
bootstrap circuit. If the
engine is off, there is no power to the electric fan or temperature
switch and the fan cannot start. However, if the fan happened to be
running when the engine was shut off, the bootstrap circuit provides
power to keep it running as long as the temperature switch calls for
airflow. As soon as it shuts off, it cannot start again.
Electric Motor Lubrication
Stefan Schulz and Chuck Johnson Jr. forwarded this procedure,
originally from Chuck Johnson Sr., for oiling a "permanently
lubricated" electric motor:
It is possible to lubricate a "permanently" lubricated bearing
by oiling the wicking that surrounds the bearing. To do so take a
sharp awl (punch) and with a hammer punch a hole into the 'bell'
shaped cover over the bearing housing. Do this through the vent holes
in the motor and NOT in the end of the motor
itself. The wicking is housed on the inside of the motor in a 'bell'
shaped tin cover so it is easy to poke a hole in it. Then just take a
oil can (I use a PLEWS oiler so I can get some volume in there but
almost any oil can that can put some pressure on the oil will work),
and 'flood' the wicking. This way you do not have to take the motor
apart to get the bearing soaking in oil. After this you can
periodically lubricate the bearing by just re-flooding the wick
through the hole you have made. This technique works with all motor
types, auto as well as small appliance and large appliance
motors.
The bearing cover that you are punching a hole in is very thin
metal, much thinner than the housing of the motor itself. If you
punch near the center, you may hit the bearing itself, and possibly
damage or misalign it. Punch the hole near the outer edge of the
cover; there will be nothing under there except the felt that's
supposed to hold oil.
Of course, some motors don't have suitable vent openings, so you
may have to open the motor anyway. This method still applies, though,
since the bearing inside is almost always retained by a
permanently-attached cover of this sort and oiling is almost
impossible WITHOUT punching a hole.
Another favorite item for applying the oil is a hypodermic
syringe, preferably one with a fat needle. With a little luck, you
can buy one in your area without being arrested for drug abuse.
Now that you have a procedure, you can oil motors periodically or
you can wait until they seize up. Your choice. Do you really believe
"permanently lubricated" means forever?
In the specific case of the XJ-S electric fan motor, Schulz adds:
... the motor is of the "definitely no user serviceable parts
inside, so do not open me" variety. Then again, you can open the
thing by forcing the pry slots at the top and close it again be
replacing the cover and punching down a bit more metal from the side.
Look at one and you'll see what I mean.
Of course, bending the metal back and forth regularly might result
in needing a new motor sooner than not oiling it at all. In these
cases, you might try a different idea: drill a hole through the
housing itself, aiming for the same area adjacent to a bearing, and
apply oil without disassembly. If it is important to keep water or
dirt out of the motor, cover the hole with a piece of aluminum tape
when you're done.
Oil Pressure Sending Unit
Many people confuse the two separate items on the XJ-S, both
located at the top rear center of the engine, just below and behind
the bellcrank. The smaller item is the warning light sender, and is a
relatively cheap item. The larger part is the sender for the gauge,
and it is more expensive and less likely to be available at a generic
auto parts store.
The sending unit is a simple variable resistor. Jim Isbell says:
I have opened up one from a series III XJ6 and found a
mechanical diaphragm to wirewound pot contraption. It essentially
acts as a variable resistor that shows high resistance at low
pressure and low resistance at high pressure.
The gauge itself is actually a current-measuring device wherein
the current heats a wire which expands to move the needle. In fact,
all the gauges except the voltmeter are essentially the same. Because
of the heating required to operate, such gauges always move slowly
and calmly rather than zipping up and down and making drivers
nervous.
Mike Cogswell reports that earlier Jaguar senders were different
than the later -- and they shouldn't be mixed.
Turns out that the Series 2 E-Types (and probably XJ-6s of the
same vintage) used 80 psi gauges while the V-12s used 100 psi gauges.
The gauges are identical except for the markings, but the senders are
different since they are the same resistance at different
pressures.
Electric Windows
They always move slowly. This tip is from Leonard Berk of Howard
Beach, NY: His windows operated very slowly, so he sprayed WD-40 down
the frames without even dismantling the doors. The windows operate
like new. Perhaps WD-40 isn't the ideal substance, since the odor may
be objectionable to some people. But it is worth noting that
lubrication may be in order.
John Himes talks about possible fixes to the drivers window not
going all the way up without using their hand.
On my 88 XJ-S, the problems was that one of the screws was
removed by a PO, or had fallen out over time that mounts the window
motor to the door and the others had become loose. The motor assy.
would move when you raised or lowered the window. After tightening
the screws and new lock washers (with the window all the way up so it
would fit correctly), the window now goes all the way up & I no
longer have the fingerprints on the window (inside anyway).
John Setters reports:
Two problems caused my drivers side window not to close fully
without assistance:
- Window motor mounting had come loose.
- The lift assist coil spring was binding on itself.
Firstly remove the door trim panel -- the hardest part! I found
that I needed to close the window fully before tightening the motor
mounting bolts. This is the way to assure correct positioning of the
closed window. Do this by applying upward lift with your hand under
the slide rail at the lower edge of the glass. Then tighten the
bolts.
Complete lift was hampered by lack of spring tension. Although
well lubricated by grease too much friction existed. I applied spray
CRC to the spring then operated the up and down movement to work the
CRC into the spring coils. Heh presto it all works fine now.
John Napoli suggests adjusting the track at the rear of the
window.
If you can't find an adjustment that solves the problem,
replace the lining of the rear channel. Jag sells a replacement
channel. I suspect that good old aftermarket channel felt can be
installed in the old channel assembly.
By the way, I once had a weird window failure in my car. The PO
had replaced the rear window channel on the drivers side. One day I
lowered the window and thunk -- the window drops down out of sight.
Opened the door up and found that the metal channel that the glass
rides in had been pulled away from the glass. It was as if the glass
had a positive stop on the way down. The motor kept on pulling the
glass down after it hit the stop and pulled the arm off. Put it back
together and it soon happened again. I solved the problem by taking
the glass out, supergluing the arm to the glass (in the correct
location!) and installing a sophisticated support that the steel arm
would hit when the window was lowered. It was a carefully shaped
chunk of 2x4. You need to glue the channel to the glass in addition
to adding the stop because if the channel is loose on the glass it
will eventually slide sideways and prevent the window from opening or
closing properly. The glue locks the channel in position and the stop
prevents the window from dropping too far and allowing the motor to
pull the channel away from the glass.
PS: On my car, the side with the new channel opens and closes
amazingly quickly. What a pleasure. The other side, with channel felt
on the ragged edge (i.e., no more adjustment possible) takes much
longer and occasionally hangs up.
Switches
The switches are always acting up.
Bob Colson of the Jaguar Club of Southern Arizona points out that
the window lift switches can be taken apart. First, remove them from
the panel -- easiest to do by first removing the panel so you can
push them out from behind. Then, by spreading the housing slightly,
the rocker itself can be popped out. Then the parts can be cleaned up
and repaired as needed. The two rocking contact plates are
symmetrical but only one end of each gets worn, so the plates can be
reversed to extend their life. The cruise control on/off/resume
switch is constructed similarly.
It is possible, however, that both the slow motors and the burned
switch contacts are symptoms of the same problem: There is too much
current going through those switches. The high resistance, due to
marginal or overloaded contacts, results in less than ideal power to
the motor and causes the contacts themselves to fail often.
One solution is to replace the switches with generic double
pole/double throw self-centering rocker switches with better contact
ratings. The difficulty here, obviously, is getting them to look
right. Phil Patton sends this tip:
I have found a switch which is less expensive, in my opinion
looks much better, and I am positive will last much, much longer.
This part fits the existing hole perfectly and has a small, coloured
illuminated strip across it, making it easy to find in the dark. It
is rated at 20 amps at 12 volts and is (unlike the Jag switch)
completely sealed so that dirt cannot contaminate the contacts. The
part is GC number 35-3565 (green light) or 35-3570 (red light). They
should be available from any decent size electronics parts house. The
only modification necessary to use this part is to cut off the plug
on the wiring harness and replace it with push-on lugs on each wire.
If you don't like the light then just don't connect it.
Another solution, and one that maintains the original appearance,
is to install relays to operate the windows and operate the relays
with the stock rocker switch. Two relays will be needed for each
window, an "up" relay and a "down" relay, and each will need to be a
double-pole relay with serious contacts -- at least 10-amp rating.
Since the current needed to operate the relays is minimal, the
switches should last forever even if they've already been abused and
cleaned up a couple times. A massive power wire should be routed to
the relays directly from the power bus on the firewall or some other
heavy-duty source (any big, fat brown wire); you can toss in an
inline fuse for safety. See Figure 8.
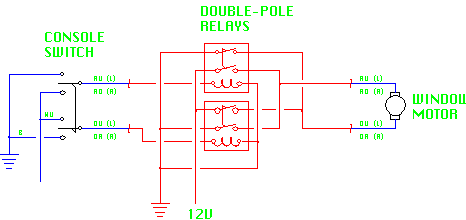
Figure 8 - Relay Addition for Window Circuit
The way electric windows work is that the motor is NOT grounded.
To run one direction, the switch grounds one motor lead and applies
12V to the other. To run the other direction, the same switch grounds
the second lead and applies 12V to the first. The relays should be
wired to do the exact same thing.
The relays can be located anywhere between the switch and the
motor. Within the door itself is one possibility; in this case, a
massive ground wire should be routed back into the car -- relying on
ground contact through a door hinge is not recommended. Also, before
closing the door up, it'd be a good idea to fasten the relays down
(possibly even with foam tape) and tie the wires down, and run the
window up and down and operate all the latches to make sure the wires
aren't in the way of moving parts.
Another possible location is adjacent to the footwells, avoiding
having to remove the door panels; you can intercept the wiring near
the door hinge. The relays can even go within the console if
preferred; I personally would not choose this location, because it
reuses too much of the original wires from there to the door, and I
think those wires are too small.
If the window switches were operational before the relay
installation, it won't even be necessary to open the console.
Wherever you are installing the relays, simply break into the RG and
GR (right side) or RU and GU (left side) wires from the rocker switch
to the motor. Wire in the relays as shown.
Keyless Operation
Some of us prefer the electric windows to be operable whenever
we're in the car, not just when the ignition is on. If you share this
preference, there is a relay under the right side of the dashboard
that provides power to the windows whenever the ignition is on. All
you have to do is remove this relay and connect the power wire
directly to the wire to the windows, and the windows will operate
whenever the buttons are pressed. Since the buttons are inside the
car anyway, it's not exactly a security risk.
Electric Mirror Adjustment
Switches
When the parts man at a Jag dealer was asked about these joystick
switches, he had the part number memorized! We're talking JUNK here,
and they charge US$85 each for the two of them. The
following is a replacement scheme that works better. Note that for
1992 the joysticks were replaced by a fancy electronic adjustment
scheme, and the following does not apply.
NOTE: The mirror circuits are always hot, even with the ignition
off. 12VDC won't electrocute you but it may cause burns or blow a
fuse, so you may want to remove the appropriate fuse or disconnect
the battery.
- Make a flat rectangular panel to replace the original chrome
escutcheon (see Figure 9). You can make this out of anything you
think would look good in your car -- chrome-plated steel, sturdy
plastic, sheet metal covered with leather, elm burl, etc.
- Buy four switches, catalog no. 275-637 from Radio Shack ($3.69
each).
- You may also want to buy some Molex connectors while you're
there, such as catalog no. 274-236 and 274-226, to replace the
hokey originals.
- Mount the switches on your panel. The upper two should be
mounted vertically and the lower two horizontally, since there
will be one up/down switch and one left/right switch for each
mirror.
- A soldering iron or gun is required here. Connect wiring as
shown in Figure 10. Note that each wire connects to two terminals.
It may also be possible to utilize the mirror switches from some
other car. More and more cars use electric mirrors these days.
Figure 9 - Panel for Mirror Switches Figure 10 - Electric Mirror
Switch Wiring
Battery
When your battery needs replacing, you will find that the XJ-S
uses an unusual battery -- and that Jaguar wants $200 for it.
Batteries are normally in engine compartments which are well
ventilated, and things still corrode right around the battery. A
trunk is not ventilated at all, so the battery vapors will corrode
the whole trunk. Worse, batteries emit hydrogen gas when charging, so
you run the risk of blowing the trunk lid off your car. The Jaguar
battery comes with an enclosed vent connected to a tube to route the
vent out through the floor of the trunk.
A standard battery can be made to serve, but you must vent the
fumes outside of the trunk. Find or make a cover to completely
enclose the vents on the top of the battery (being selective when you
buy the battery may help here), or an airtight container for the
entire battery. Connect a vent tube and run it out through the floor
of the trunk. B. J. Kroppe suggests "install a DIN cover over your
battery. (DIN battery covers are found on BMWs and Mercs)."
According to Randy Wilson, an Audi 5000 battery (Audi put the
battery in the passenger cabin, so it has similar venting provisions)
will fit with the addition of a half inch plywood shim. He also
reports that Interstate offers an add-on vent kit for their
batteries. And there are some marine batteries with vent provisions.
Michael Neal suggests a battery made by Optima. This is a leadacid
unit but uses six separate coils instead of plates; it uses a gel
electrolyte and is reportedly sealed, no vent required. "So far they
have proven nearly indestructible." It is about $120 with a 6-year
warranty, free replacement within the first two years.
Delco Freedom batteries come with a vent/cap assembly that has two
vent openings. Each is sort of a flat oval shape, but it may still be
possible to connect tubing to them.
With careful selection, the vent cover from the old Jaguar battery
can be used on a generic replacement battery. Georges Krcmery says:
The EXIDE MegaCell # E42 50W has a rectangular slot around it's
filler caps which exactly matches the vent cover with only a slight
adjustment: I had to cut off about 1 cm of the slot's lip to
accommodate a similar widening under the nipple of the vent cover. It
then snapped right into place. The battery is about 1/4" too wide to
fit in the tray. Fortunately, the bottom of the battery has extra
plastic on each side and it is possible to carefully saw off 1/8" on
both sides to make it fit.
Winter Storage
Herbert Sodher hails from the cold North where people store their
Jaguars all winter and drive less valuable vehicles in the snow. When
stored that long, the battery in the XJ-S tends to go dead. The
alternator, clock, and some stereos and security systems put a small
drain on the battery when the car is parked. Jaguar recommends
disconnecting the battery if stored more than a month, but that may
be assuming too much about the condition of the battery and how easy
the engine will be to start. And, disconnecting the battery requires
resetting the clock, all the stations on the digital radio, and
possibly some security stuff, all of which is a pain.
Sodher suggests the owner go to an auto supply store and purchase
an on-board, fully automatic trickle charger and install it in the
car. One called the Mity-Mite is made by Schumacher Electric Corp.,
is rated at 1.5 amp, and costs around $30. This unit is so small that
Sodher attached it right to the front of his battery with Velcro, and
the battery cover will fit over it (his battery is not the original
-- it may require a different location for the Jaguar battery). It
comes with eyelet connectors that can be connected directly to the
battery terminals. Merely remove the nut on the clamping bolt from
each terminal, put on the connectors, and reinstall the nuts. The
unit comes with a one-foot power cord, just enough to feed outside
the battery box. When parked for extended periods, merely run an
extension cord into the trunk. The unit will automatically charge the
battery as required, and won't overcharge it.
Windshield Wipers
Wipers Not Parking
If your wipers don't park, you may be tempted to start tearing the
wiper motor apart to work on the parking contacts -- but you would be
forgetting that this is Lucas you're dealing with. As Mark Roberts
found out, the problem is every bit as likely to be within the stalk
switch.
Because the wipers would park in intermittent mode, I was
skeptical about the problem being with the parking micro switch, but
checked it anyway. Micro switch was fine. The problem was traced down
to the stalk switch. In the off position, pins 5 & 6 (ULG &
BLG respectively) are suppose to be shorted together, to provide a
ground path for the motor. They are also supposed to be shorted when
in intermittent mode for the same reason. On my switch, 5 & 6
were shorted in intermittent mode, but OPEN in the off position...no
ground, no work.
Parking Position Adjustment
For some reason, the XJ-S wiper pivots are symmetrically located,
so the driver's side wiper bumps into the windshield frame when
parked. To solve this, the official adjustment scheme is to adjust
that wiper to park up high so it doesn't hit the frame, but it looks
stupid -- and is right in the driver's face. Just to make sure you're
aggravated, the wipers park on the right in countries where they
drive on the left, and vice versa; it's always in the driver's face.
One workable solution is to modify the driver's side wiper arm to
be shorter. This requires carefully unfolding the sheet metal where
it is wrapped around the strut, and drilling out the rivet just above
the spring attachment. Then the strut can be cut about an inch
shorter, drilled and bent to form a new spring attachment, a new
rivet hole drilled, and then the strut can be reattached with a new
rivet (a pop rivet will do) and the sheet metal re-crimped around the
strut. A little flat black paint, and no one will know the original
design was so poor. With the shorter arm, the left wiper can be
positioned much closer to the bottom of the windshield. Note that the
shorter wiper will not reach as far toward the top of the windshield
either, but this doesn't seem to pose a problem.
Another possible solution is to alter the wipers so they park on
the passenger's side. In the case of the later Electrolux motor,
Stefan Schulz says this can be done by merely opening the motor
gearbox and moving the park cam 180 degrees; it might be possible to
make a similar change on the earlier Lucas motor. Or, you could
arrange to buy a wiper motor from another country, or even trade with
somebody in that country who's trying to make the same fix! You will
need to purchase Jaguar wiper arms that have the little bend the
opposite direction. Of course, after all this the wipers will still
be just as obtrusive, but they will be aggravating the passenger
instead of the driver.
Motor Durability
A design problem with the Lucas wiper motor is that the drive
gears at the wiper arm shafts are plastic. Wear is a reported
problem, and can be aggravated by operating the wipers on a dry
windshield. It is suggested that the XJ-S owner use Rain-X or similar
product on the windshield on a regular basis. This will make the
water run off so the wipers need not be used as often, and it will
also make the surface of the glass more slippery, so the wipers move
more easily.
Note that 1987-on cars may be fitted with an Electrolux motor;
this unit has metal gears at the wiper arm shafts. Stefan Schulz says
The parts guy at my local Jag dealer says that it is
not a drop-in replacement for the Lucas one.
Wiper Arm Mount
The wiper arms are mounted on the shafts with a taper fit, held
tight with a nut that is covered with a plastic clip. However, the
base portion of the arm is made of aluminum, and a slight growth or
wallowing of the tapered hole is an occasional problem. Contrary to
expectations, this cannot be dealt with by merely tightening the nut
further. The nut bottoms on a shoulder above the taper, and the arm
remains loose.
This problem can be easily corrected. Cut a piece from thin sheet
aluminum (old real estate signs work great!) and roll it into a
conical shim. Installed between the shaft and the arm, it will
provide a tight fit.
Directly under this joint is supposed to be a piece of rubber that
looks like it might keep dirt and water out of the bearing. If this
seal is rotten or missing, you probably won't wanna pay Jaguar for a
new one. Reportedly, a visit to a hardware store should provide
choices for substitutes; there are many parts shaped more or less
like this, notably in the plumbing stuff - valve parts and seals,
etc. You might have to do a little cutting.
Wiper Motor
The housing of the wiper motor consists of a cylindrical can with
covers on each end. The cylindrical can has a notch cut at one end to
form a drain hole to keep water from collecting inside the motor.
Unfortunately, the drain hole is not at the bottom! To correct the
problem, Jaguar provides a plastic cover over the motor to keep water
from getting on it.
If you have trouble with the wiper motor, proceed as follows:
Removal
Removing the wiper motor involves removing the entire intake
grille assembly in front of the windshield. It doesn't look hard, but
there may be trouble; the two fasteners closest to the windshield
actually involve a rubber isolation mount, and trying to unscrew the
nut may just rip the mount apart if you are unlucky today.
Fortunately, it isn't too difficult to improvise a replacement mount
scheme using a small bolt, a couple nuts, and a rubber grommet or
two. It probably wouldn't be a good idea to rigidly mount the grille,
though; Jaguar probably used the rubber mount for a reason.
Disassembly and Repair
To repair the wiper motor:
- Mark the housing before taking it apart. The parts must line
up the same way when reassembled. Also, mark where the bottom is
as installed in the car.
- Clean up the internal parts, especially the brushes, which
tend to jam when they've been wet for a while. Make sure the
brushes slide freely.
- Cut an additional notch in the housing, this time at the
bottom.
- After reassembly, it wouldn't hurt to cover the top of the
motor with aluminum tape (available where air conditioning
supplies are sold -- it's used to seal ductwork) to help prevent
water from getting in.
Of course, providing a new plastic cover over the assembly would
help for a while. Notice that the assumption was made here that the
original is no longer on the job. Yes, it's junk. The aluminum tape
in step no. 4 is likely to be the prime protection in the long run.
Chuck Roach says:
I went to my Jag dealer to pick up a new cover and the
parts/service manager told me to forget it and just use an old
one-gallon plastic bottle and cut it to fit and hold it in place with
cable ties. Worked great. Will probably last as long as the
original.
I disagree; it's likely to last a good deal longer than the
original.
By the way, if you're wondering where the original cover went, you
need to read about water leaking in
through the A/C system.
Light Bulbs
If you have WWW browsing capability and a credit card, you can
order whatever bulbs you're ever likely to need from:
http://www.stelcom.com/lamptech/auto.html
Thanks to Richard King for this tip.
Indicator Light Bulbs
The tiny bulbs used in the row of indicator lights at the top of
the dashboard can be found at any Toyota dealer. Best to take the old
one to show the parts man what you need, since he's only familiar
with Toyotas and doesn't know what a Jaguar indicator light looks
like.
Turn Signal Bulbs
The stock bulbs are generally only available in the UK, but of
course the standard 1156 and 1157 bulbs will fit. However, if you try
to use 1034 bulbs, the indicator on the dashboard may only light the
first blink, or not at all, when you operate the turn signals. This
is the bulb failure indication for the turn signals. Since the 1034
bulbs are lower wattage, the reduced current causes a bulb failure
indication.
Headlights
If you have WWW browsing capability, you can learn everything you
need to know about headlights in general at:
http://www1.openmarket.com/personal/caloccia/lr/lighting.faq.html
Thanks to Richard King for this tip.
Headlight Brightness
Jon Jackson and others point out that dim headlights may be the
result of bad grounds.
On my 1987 XJ-S there is a ground under the hood to the left
side of the radiator. There are several ground wires that go to this
same point. Cleaned it up a bit and all is great.
Headlight Wiring
The headlight and fog light wiring diagram in the Supplement to
the Repair Operation Manual, copyright 1982, is too screwed up to
follow. Figure 11 is a replacement for the diagram, based on an
actual 1983 H.E.; note that if your wiring matches this schematic it
is impossible to operate the fog lights (see
Fog Light Wiring, below). Figure
11 - Headlight and Fog Light Wiring
The headlight switch in the 1983 H.E. has five positions, three
above and one below the off position. To get into the top or bottom
position requires pushing the knob in while turning. The connections
made in the positions are as follows:
3: 1-2-3-5
2: 1-2-3-4
1: 1-2-3
0: No connection
-1: 1-2
The -1 position, connecting only the dash lights and right side
parking lights, apparently serves no intended purpose; as wired, all
the parking lights come on due to backfeed through the bulb failure
sensors. After a few seconds for the bulb failure sensors to warm up,
the left side parking lights dim. If an owner wished, however, it
would be a simple matter to rewire the right side parking lights to
terminal 3 and use the -1 position to operate the dash lights only.
Headlight Switch Knob Removal
To remove the headlight switch knob, you must depress a button in
the shaft that is behind the surface of the dashboard and points
down. To reinstall, you merely need to push the knob on, because it
is shaped to slide over the shaft button and snap in place.
High/Low Beam Relay
In some manuals, the schematics of the high/low beam relay (Jaguar
part no. C38616) show the components between connections 56, 56a, and
56b to be a normal set of relay contacts. This is NOT actually the
case. This device is an electrically-operated rocker switch; when the
coil is energized, the contact is switched from one side to the
other, and remains there when the coil is de-energized. Figure 12
- High/Low Relay Replacement Scheme
If your high/low relay has given up the ghost and you don't like
the price of a replacement, an alternate scheme using 3 relays and a
diode is shown in Figure 12. Note that wiring (and related contacts)
indicated by heavy (red) lines must be suitable for headlight
current, 30 amps or so. All other circuits are less than 3 amp. For
the diode, a Radio Shack cat. no. 276-1661 will do nicely. Of course,
you will need to figure out where to mount these relays; perhaps in
the space behind the left headlights.
As with any such circuit, a single multi-contact relay may be
replaced by multiple single-contact relays by simply wiring the coils
together. This may make sense here, allowing the use of SPDT 30-amp
relays along with tiny "ice cube" DPDT relays instead of trying to
locate DPDT or 3PDT 30-amp relays.
The only functional difference with this circuit from the original
is that your headlights will always be on low beam when you first
turn them on.
Fog Light Wiring
If your fog lights don't work, you may not be alone; some don't
work because they were wired incorrectly from the factory.
Apparently, in some countries Jaguars are fitted with "fog warning
lamps" at the rear of the car; the top position on the headlight
switch turns these rear fog lights on. The front fog lights are
operated by a "fog lamp switch." The 1983 XJ-S (American version) has
no rear fog lights, and no fog lamp switch. The top position on the
headlight switch sends power to unused connectors at the rear of the
car, and there is no way to turn on the front fog lamps.
The fog light wiring can be corrected by simply reconnecting a
wire from fuse 1 to fuse 6. Be sure to leave the existing wire on
fuse 6 connected to operate the dash indicator. With this system, the
top position of the headlight switch will operate the fog lights and
the low beams; high beams are inoperable to avoid conflict with some
state laws.
If you have genuine fog lights (yellow lenses), it usually makes
sense to wire them so that the fog lights can be operated without any
headlights. This would optimize visibility in foggy conditions, where
the headlights simply cause glare. The rewiring scheme shown in
Figure 13 causes the fog lights only to operate on the top position
of the headlight switch. Although the inhibit relay is shown
disconnected, it would be just as well to remove it entirely in this
scheme, as it serves no function. Figure 13 - Rewiring For Fog
Lights Only
It is possible to rewire the Jag so that all six lights work at
once; this makes sense if the car is fitted with driving lights
instead of fog lights. The suggested scheme (shown in Figure 14) is
designed such that in the top position of the headlight switch, both
the driving lights and the high beams operate as high beams, and the
low beams remain unaltered. Two new relays (30 amp contacts) are
needed, and a new 12V supply circuit is called
for.
When installing these relays, it is convenient to install the one
on the left in the drawing near the high/low relay at the front left
of the engine compartment, as all the necessary wires are nearby; the
harness will have to be opened to get at the red/yellow fog light
wires. The relay on the right should be installed under the dash, as
its wires are convenient there.
The reconnection at the inhibit relay is very easy, because Jaguar
ran the appropriate wire to an unused port in the relay socket just
for you. All you have to do is remove the blue and the blue/red wires
from the socket and reverse them.
The scheme will also work if the new relay on the right in the
schematic is omitted, no new 12V supply is run, and the circuit is
left connected to fuse #6. However, the system shown is suggested to
avoid overloading any existing circuits -- especially if you install
high-powered driving lights.
In many states, there have been laws that prohibit there being
more than four headlights on a car. Jaguar's intention for the
inhibit relay was to prevent use of the high beams while the
fog/driving lights are on, thereby complying with the law. It is
unknown how these laws have evolved now that the law requiring
standardized headlights has finally been eliminated (thank God!) so
Jaguar can use the European single headlight assemblies here in
America. The owner is advised to check his state's current
regulations before rewiring for all six lights to operate at once as
shown above. Figure 14 - Rewiring For All Six Headlights At
Once
Driving Lights
If you wish to replace your fog lights with driving lights, or
have destroyed your original driving lights,
J. C. Whitney catalog number
14XX9739Y is a good choice. These lights look good, have a similar
appearance to the originals, have a rustproof plastic housing -- and
the box they come in has an illustration of an XJ-S on it!
There are many excellent driving light kits on the market, and
almost any of the rectangular style can be fitted to the XJ-S and
will look proper. It's a good idea to check on the availability of
replacement lenses, since they are prone to damage. WalMart and
AutoZone offer kits with the replacement lenses for sale right next
to them on the rack! You can also check to see if the lenses are
thick and substantial to resist all but the most powerful impacts.
Most driving lights use an H3 bulb; standard wattage H3 bulbs as
well as high-power bulbs are readily available.
Headlight Buzzer
The XJ-S doesn't come with one! What a cheap car. To add one is
easy. You need a 12 volt buzzer such as catalog no. 273-055 from
Radio Shack, and a rectifier (or diode) such as catalog no. 276-1661.
For the buzzer you can also use any buzzer you've ripped out of a
car, such as those pesky seat belt buzzers.
Connect one of the headlight wires to one end of the rectifier.
Connect the other end of the rectifier to one lead of the buzzer.
Connect the other lead of the buzzer to one of the ignition wires.
Both of these wires are near each other under the dashboard -- from
the headlight switch and the ignition switch.
A rectifier allows current to flow in only one direction. If you
have wired it correctly, when both the ignition and the headlights
are on, there is no current flow because both wires are at 12 volts.
When the ignition alone is on, there is no flow because the rectifier
stops it from flowing that way. When the headlights are on but the
ignition is off, current flows and the buzzer buzzes. If the buzzer
buzzes when the ignition is on and the headlights are off, reverse
the rectifier.
Jan Wikström did it a different way:
Pulling the key out also operates the switch that controls seat
belt warning etc. As my car doesn't have those, I've used it to
operate a "headlights on" warning buzzer.
Bulb Failure Units
There are bulb failure units in the trunk right next to the trunk
lights, as well as under the right side dashboard. The Supplement to
the Repair Operation Manual says there is only one under the dash to
serve the lights on the front of the car, but it lies; there are two,
one serving the front right and one serving the front left. They all
look the same: a small metal box with three connectors. The current
to a light goes in one connector and out another, heating up a
conductor inside. When it gets hot enough, a bimetal strip bends
enough to break the third connection to the dash indicator. This is
why it takes a few seconds for the indicator to go out when you turn
on the lights. If a bulb burns out, the reduced current doesn't heat
the bimetal strip enough, so the indicator stays on.
If your dash indicator is staying lit for unknown reasons, the
first thing to do is check that all the lights on the car are of the
correct wattage (see below). A lower-current bulb can fool the units.
Then, find each unit and disconnect the indicator wires (WS) one by
one until you find which unit is keeping the indicator on.
If one of the units isn't working right, they can be adjusted.
There is a tiny screw on the box near the connectors, sealed with a
drop of glue. When you're absolutely sure all the bulbs are working
right, leave the lights on for a couple minutes. Turn the screw
clockwise until the dash light comes on, then counterclockwise just
until it turns off. Be careful not to touch ground with the tool used
to adjust the screw.
There is a different type of failure sensor on the brake lights,
but it operates the same dash indicator. With the ignition on,
headlights off, handbrake applied, and the brake pedal pressed, the
indicator should come on; if it does not, there's a bad circuit or
bulb in the brake lights.
The indication that a turn signal bulb has failed is that the turn
signal dash indicator just blinks once, or not at all, while the
functional bulbs on the outside of the car continue to blink
properly.
Third Brake Light Bulb Replacement
It may not be obvious at first, so John Himes sends this
description for getting to the bulbs:
Feel or look on the underside of the cover; there are 2 black
indentations on each side of the cover. Place your fingers on each of
these, or you can also do one at a time. Press up on the indentation
which is a sprung black square button that keeps the cover from
rattling off. After your remove the cover, you have access to the
bulbs. They are in gray plastic holders that you turn 1/2 turn to
release.
Gauges Reading Low
Brian W. Rice writes:
All gauges in my 1985 XJ-S read low by 25% when I acquired the
car several years ago. I did some tests by lifting No. 4 fuse and
applying a variable voltage to the dead end from a power supply,
making sure not to exceed 15 volts. With precisely 12 volts applied
the voltmeter showed about 9 volts. The fuel gauge also only
indicated 3/4 with a full tank of petrol.
I removed the instrumentation panel, quite an easy job, and
investigated on the bench. All gauges showed corrosion at the rear
terminal nuts and washers where they contact the flexible printed
wiring assembly. I was able to repair by soldering tinned copper wire
to the flexible circuit board tracks being careful not to melt the
plastic flexible board and fashioning the wire into circular washers
to go under the terminal nuts thus establishing good contacts again.
Gauges now work as designed.
Radio Removal
Steve Broady, regarding the late-1980's radio:
Assuming your radio is a Blaupunkt made in Korea, you will need
to cut a coat hanger into 2 pieces like a pair of U's to push into
the front plate holes to remove radio from bracket. When you pull the
radio out of the dash watch for ground strap on left side as bolt
protrudes into bracket. Once out you will find 2 live input wires
with fuses; one is for clock and code function, the other for radio,
tape, antenna.
Radio Security
According to Greg Meboe:
The 1986 Jags came with the removable-face tape deck, a design
which has made radio repair/replacement outfits a lot of money due to
its low service life. The face comes off to ward against theft, but
the connectors for the face don't seem to cut the mustard.
Somewhere around 1986, Jaguars came with a radio that had another
security feature: if the power was disconnected, the radio would
never work again unless the correct security code is entered.
Presumably, people who steal radios won't steal one they can't use.
Of course, you can choose any repair procedure in the manual, and
chances are the first step is to disconnect the battery. If you
already went through this and your radio is now nonfunctional (or you
have stolen such a radio), you apparently will need to contact your
friendly dealer to obtain the security code. You may also need to
provide a serial number that begins with "B" that is on the case of
the radio.
If you would like to avoid the grief, reportedly there is a
product on the market that can be plugged into the cigarette lighter.
It uses a 9V battery, and will keep a small amount of power on the
system while the battery is disconnected. It will supposedly keep the
radio operational, stations programmed, etc.
Condensation
Deflector Shield
Apparently, either plugged
condensate drains in the A/C system or leaking heater cores have
a tendency to dump water on the stereo -- and some of those stereos
ain't cheap! So, Technical Service Bulletin #8685 says essentially
that a "condensation deflector shield" MUST be installed on all XJ-S
vehicles prior to VIN 163790 whenever the mechanic is working in the
area. The part number for the deflector is CBC 9193, and it appears
to be VERY easy to install, requiring only 0.10 hours.
Brake Fluid Level Switch
The switch in the cover for the brake fluid reservoir is supposed
to light an indicator on the dashboard when the level is low. The
rubber cover over the connectors has a bump in the center. Pressing
the bump forces the float downwards and closes the contacts,
providing a circuit and bulb test.
Unfortunately, the switch is garbage and the indicator may never
come on, or may stay on all the time. The float for the switch is a
piece of cork, which rots, soaks up fluid and sinks, etc. The
protective metal cover over the cork float gets full of junk and jams
the float. The contacts within the switch, despite evidently being
silver plated, get corroded and fail to make a connection.
An acceptable method of correcting this switch's problems has not
yet been developed. The cork is easily replaced with one from a wine
bottle, and the metal cover's problems are solved by removing it. The
contacts themselves can be serviced by using a tiny screwdriver to
pry the switch assembly out of the top of the reservoir cover; don't
lose the little metal sleeves that keep the contact screws from
tightening down onto the plastic.
But this switch needs to be ultra-reliable, since it is rarely
tested and failure to work when needed can be disastrous. While it's
easy enough to get it working with the procedures above, there's no
apparent way to get it to keep working. At this point,
it can only be recommended that XJ-S owners avoid trusting the
indicator and check their brake fluid level frequently -- and check
the operation of the switch frequently, too.
Glovebox Light
The XJ-S doesn't have one! What a cheap car. It's easy enough to
install one, though. Just buy a suitable light fixture at your
favorite auto parts joint, and install it in the top of the
compartment just behind the latch. Wire it into the interior light
switch just to the left, so when the switch is operated it will turn
on both the right front interior light and the glovebox light.
Cigarette Lighter
Apparently, some XJ-S's were equipped with some sort of
non-standard cigarette lighter. This causes two problems: first, when
the element in the lighter quits working, it's hard to find a
replacement; and second, it may prove difficult to plug
non-cigarette-lighter accessories into the cigarette lighter hole. If
you are having either of these troubles, the easiest solution is to
drop by any auto parts store and buy a generic cigarette lighter and
install it, and throw that hokey Jaguar one out.
Radio Antenna
Adjusting Drive Clutch
Steve Leamy sends instructions on adjusting the drive clutch:
This repair covers ant that just wont quite make it up or down
and still makes a clicking noise before stopping.
You want to get to the side of the unit that looks like a cup
and has a screw in the middle of it. Remove the screw and the cover
and you will have now exposed the clutch drive for the ant. On the
shaft in center you will find a locking nut which you will now back
off 1 or 2 turns, now grip the metal clutch and tighten 1/2 turn.
Retighten locking nut and prop unit up so you can test it. Turn key
on and radio and ant will raise in 15 to 20 seconds, once ant reaches
full height you should hear 3 bumps and ant motor should shut off.
Turn key off and ant should go down completely and 3 bumps and motor
will cut off. If ant still does not go full up or down adjust clutch
in quarter turns until a full stroke is attained.
On 1988 and above XJ's I have found three different
manufacturers of ant in the cars I have serviced the but all of them
use some type of clutch system and can be fixed by resetting of the
tension on it.
Some models use a plastic drive wire instead of metal; you can
repair these with weed eater line but you have to remove the motor
base and ant to service it.
Antenna Repair Kit
A repair kit is available for some Jaguar antennas, including the
mast and the plastic gear rack. According to Hal Rogers of
H. D. Rogers & Sons:
It depends on which Jaguar... i.e., which antenna assembly that
you have. A replaceable mast is available for the Hirschman brand
antennas...the mast is the same for some German cars. The Jaguar
equivalent part number is DBC2200. Mostly late 1980s-up cars...
Next, if you have an older Jaguar, they had a Japanese
manufactured antenna. It does not have a replaceable mast, never did.
The unit that we sell which is a replacement unit, not exactly the
original, and you may need a fitting kit as well...It replaces
DAC3542 or DAC4090 Jaguar part number.
There is not a real easy aftermarket replacement for the late
Hirschman...though you can change the mast.
Also, see Jaguar
All-Parts.
Replacement
The original Jaguar antenna is incredibly expensive, even when the
mail order shops put it on sale. If you're not real concerned about
maintaining the appearance of the inside of the trunk, you can
replace the antenna and its delay relay with catalog number 03-9579A
from J. C. Whitney for US$35. It
doesn't have that 10-second delay before going down, but nobody's
ever figured out what that's for anyway.
Connect the green wire from the antenna to the white/pink wire in
the car. Connect the red wire from the antenna to the brown wire in
the car (brown wires are the generic Jaguar 12V power wires). Make
sure the housing of the antenna motor is grounded to the car, either
by the mounting scheme or by connecting the black wire to it. Also,
this antenna has a drain tube to dispose of rain water that runs down
the antenna into the housing; route the drain tube somewhere outside
the car.
The antenna installation instructions also direct you to adjust
the antenna trimmer on the radio. However, if your radio has an
electronic tuner (digital display instead of mechanical needle), it
probably has no such adjustment.
This is not the only antenna available that can be made to fit
this car, and in fact a suitable replacement can probably be found at
most auto sound system shops. Be sure to ask for a "fully automatic"
model; don't get one that you have to press a switch to raise and
lower it.
Tom Graham put a Radio Shack antenna into his Series 3 XJ6, but it
looks like the same would work for the XJ-S
...Radio Shack, number 12-1330A. It works, including the delay
retraction.
As compared the Jag unit which has the telescoping tubing in
the fender well and the motor in the trunk, the RS unit is all one
unit. Thus it all must fit into the same fender area as the Jag's
telescope unit.
Start by taking out the Jag unit. When you pull out the Jag
motor assembly it has three electrical connections. The ground strap
is obvious. A blue/white wire runs to the motor relay and a blue/red
wire runs to the motor relay. We will use the relay connection for
the blue/red wire to control the RS antenna.
The electrical connections are relatively easy. The RS unit has
three electrical wires, one black, one orange, one red (and the
antenna). The black wire is ground. The orange wire controls the
antenna motor thus making the antenna go up or down. That is, when
the orange wire has voltage on it, the antenna raises. When voltage
drops off of the orange wire, the antenna retracts. Connect this
orange wire to the original Jag antenna motor relay, where the Jag
wire blue/red was. Do you remember where the blue/red wire was on the
relay - it is in the middle of all the connectors (NOT the top
outside one, that was the blue/white wire). HOWEVER, my Jag
"electrical schematic" shows these wires reversed. Better check
yours. The Jag relay spade connector we want will have voltage
(battery) on it when the radio is on. Check this with a volt meter to
chassis ground. Then turn the radio off, the voltage will drop off in
about 15 seconds (this is how the delay works). Connect the RS orange
wire to that relay spade connector. The RS red wire is for power to
the antenna motor, it comes with a 5 amp inline fuse. Connect this
red wire to the (brown) wire. This completes the electrical wiring of
the RS unit. You will note with pleasure that the antenna still has
the delayed retracting feature of the Jag.
It appears that the Radio Shack and
J. C. Whitney power antennas,
and probably most of the other ones on the market, work pretty much
the same way; there is a ground wire, a power wire, and a signal
wire. Simply select one that will fit in the space. The major
difference between the two installations described is that Graham
chose to keep the original Jaguar antenna relay in the circuit to
maintain the delay, and this method would probably work just as well
with any other aftermarket power antenna.
Roller Microswitches
The microswitches on the throttle linkage and on the shifter look
tricky with their little rollers and all. However, they are in fact a
standard item, and are readily available at your local electronics
store -- complete with identical rollers.
Trip Computer Fuel Mileage
The CATALOGUE reports that erratic fuel
mileage readings can be caused by a poor connection at the fuel
injector resistor pack. The fuel gauge readings are unaffected.
Jaguar Diagnostic System (JDS)
Later Jaguars are fitted with connections for an electronic
diagnostic system. A knowledgeable mechanic, who shall remain
nameless here, sends the following words:
JDS stands for Jaguar Diagnostic System. Basically it is a
processor that ties into the serial ports in the car wiring. However
good this may sound, it is no more than a glorified wiring diagram.
It sends you down the circuit you are checking and you end up more
often with a car that is torn apart and not fixed. All Jaguar dealers
in the U.S. were forcibly recommended to purchase one of these
US$23,000 units back in the late 1980's.
The new P.D.U. diagnostic unit which is supposed to be the new
JDS is a self-contained unit that can be taken on road tests. Gen Rad
is the manufacturer of both of these machines. The P.D.U., already
dubbed as "Pretty Damn Useless", is a very complex unit. It uses
CDROMs instead of 3.5 floppies. The screen is about 4" square, green
display. It is a very difficult unit to use. The techs that have been
to school for the P.D.U. still have very little understanding of
it.
Seat Heater
Later XJ-S cars come with a seat heater, and apparently it lacks
reliability. Stefan Schulz sends a description of the repair of this
unit:
The seat is connected to the car electrics through three
different connectors, one for the seat belt logic (cable runs under
centre console, pull carefully to expose connector), one for the
lumbar pump, and one for the seat heater. The latter two are under
the seat and can be accessed most easily by moving the seat as far to
the rear as possible.
Having disconnected the seat heater connector, check with a
voltmeter whether it delivers power when the seat heater is switched
on. If it does, the problem is somewhere in the seat. Remove
seat.
Turn seat upside down in a clean area. Locate the connector
that connects the bottom seat heater in series with the one in the
backrest. Pull it apart. Use an ohmmeter to figure out whether the
bottom or the backrest heater is faulty.
If the bottom heater is faulty, remove the black rubber cover
from the bottom of the seat. See where the heater power supply wiring
enters the bottom cushion? Good. Carefully pull it apart at that
point, exposing the top of a cheap and nasty heater element.
Cut the top covering of the heater element to one side of the
thermostat and flip it over to the other side to expose the
thermostat element. Don't cut it away, you'll need to put it back
later.
There are three joints within the seat heater element.
Orange/slate wire to thermostat, thermostat to heater element, heater
element to black wire. Examine all three joints. Note that they get
hot (hey, they're part of a heater) and are moved and flexed
constantly. Solder joints should never be used in areas that get hot
or which are under mechanical stress like the one these wires are
experiencing. So what did the cheapskate Jaguar designers use?
Exactly. The thermostat is cheap too, and its connection lugs will be
badly oxidized.
Take out the thermostat and subject it to the usual boiling
water/ice water routine to test it. Check with an ohmmeter that it
opens when in hot water and closes when in cold. Being more precise
with a cheap part like that is a waste of time. If you find that the
thermostat is faulty, you'll see that it is not a Jaguar part. Jaguar
wants you to replace the entire heater and cushion assembly. But this
'stat doesn't do anything any other 45degreesC/12V/10Amp bimetallic
'stat wont do, so get a replacement from an electronics shop if
necessary.
Solder the thermostat back in, using weaponsgrade solder wire
with a high silver content and consequently high melting point. You
did remember to dry and clean the connection lugs first, of course.
Resolder the third connection (heater to black wire) as a matter of
course.
Squeeze the thermostat back into the cushion, make sure that
none of the heater wires touch it. Put back the top covering using
solventfree glue and a staple at the end. If you use glue containing
solvent, you will find that that works the same way as the naturally
occurring rot of the seat foam, only a lot faster seconds instead of
years. Use an ohmmeter to check the resistance offered across the
seat heater connector now it should be about 1.8 ohms.
Refit all the other components by reversing the removal
sequence. Put the seat back in the car and connect it (remember the
seat belt logic connector!)
Boot Lock
According to Mike Cogswell, electric boot locks were introduced in
1989 models. According to his dealer, they cannot be retrofitted to
earlier models.
Key Fob Lock
According to Mike Cogswell, the key fob security systems were
introduced in 1989 as a dealer-installed option. Apparently these
cannot be fitted to earlier models.
On to the Cruise
Control


