|
13 - Accessories and Misc ( ,
)
13..5 - Leaky Boots and Damp Carpets ( ,
)
Places to check for that annoying boot leak:
Plastic trim mounting holes: squirt some silicone around the holes.
Fuel filler gasket: Damage to the rubber, and/ or a clogged or deteriorated drain tube, can often be hidden under the crap which tends to collect in there. (This can also resulted in occasional fuel odor in the boot.)
Antenna grommet.
All are pretty easy to diagnose with a little water on a dry day.
A not impossible situation, if a leaky boot is not noticed is some mould on the carpet. Give it a clean and hang it in the sun. The UV light kills off the mould and the fresh air should remove the smell.
13.1 - Windscreen Washers ( ,
)
Leaking Washer Bottle
Not uncommon, some crack along the bottom. The washer bottle is in two parts, with a rubber ring seal between the two.
You have to remove the plastic underwing protector to get at it. Watch out when getting a replacement - there are different types. It's not impossible to fix the bottle with fiberglass should you have problems getting a replacement.
Remove the two 10mm attachment bolts that hold the upper reservoir in place, twist it a little and it should pop out. The problem is a hardened ‘O’ ring which doesn’t seal properly.
Incidentally the lower reservoir holds almost a gallon of washer fluid on the headlight power wash models.
13.10 - Using the Shop Manual CD ( John Pring,
)
1) Load the XJ40 Repair Manual CD ROM.
2) Click on the “ScanFile Retrieve” file from the Start Programs menu.
3) When the User Screen comes up, click on the “Folder” icon at the upper left side menu bar.
4) When the Dialog Box comes up, go to the bottom and click on the CD drive. A series of 13 total volumes will be listed on the CD.
The 1st Shop Repair Manual (8 Volumes) is designed for the 1990 -1994 XJ40 Model Years. They include the 2.9L, 3.2L and 4.0L engines.
The 2nd Shop Repair Manual (5 Volumes) is designed for the late '87, '88, and '89 XJ40 Model Years. They include the 2.9L and 3.6L engines.
5) Double click on desired Repair Manual “Volume”, a dialog box comes up with search options.
6) Click "Begin Search". A new dialog box will come up with a listing of the pages in that section. The Table of Contents image (hidden) will be located behind the listing of pages. Icons will become active on the left side menu bar.
The first page of the selected Volume is a title page with a listing of the sections. The next few pages are a detailed listing of that Section's contents. The remainder of the Volume is the technical information and detail.
7) Highlight the entire Volume by using the right mouse button.
8) Choose "Select", then "All". All the pages will turn yellow.
Once you have highlighted the entire Volume, you have the option of walking through the Volume page by page by clicking on the “Blue Book with Red Arrow” icon or going directly to the page desired by scrolling down and clicking on it.
13.2 - Windscreen Wipers Park ( Peter Crosby / Dave Hurlston,
)

fig. 1
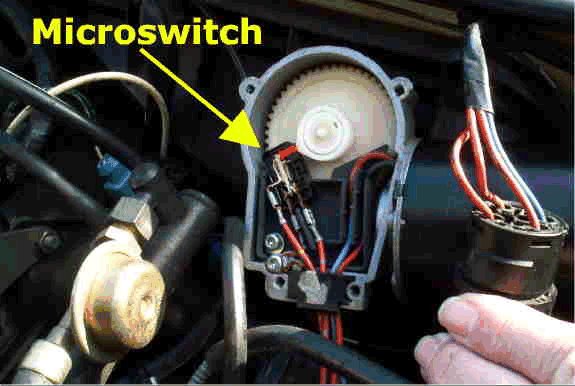
Fig. 2
|
This is a description of the wiper park function on the early XJ40s. I have to assume the later cars work the same way.
There are 3 modes for the wiper:
1. High and low speeds.
2. Single wipe.
3. Intermittent wipe.
There are 3 power connections to the wiper motor itself. One each for high and low speeds (primary power) and the other is for parking (parking power). Control and application of each is handled by the car's central microprocessor (ECU), which takes input from the wiper stalk switch, in conjunction with the wiper logic unit (WLU).
When you turn on high or low speed the wiper motor uses the primary power connections to supply power to either the low-speed or the high-speed motor windings. When you turn them off, the parking power comes into play. More about this below.
When you pull the stalk for a single wipe, you supply power to the motor through the primary power connection (low-speed) as long as you hold the stalk pulled toward you. When you release it, that connection is broken and the parking power again comes into play.
When you enable intermittent wipe, the ECU pulses the primary power via the WLU to move the wiper out of the park position, then releases that power and, again, the parking power engages. If you listen carefully, you can hear the primary power connection relay in the WLU click on and off. The interval for intermittent wipe is not, at least in the early cars, adjustable.
Now, how does the parking power work? This power goes through an undocumented inline fuse behind the passenger's side underscuttle. The fuse is rated at 5 amps. The wiring is such that power is only supplied to the park circuit when it is not supplied through the primary circuits. The power is applied through a switch (park switch) which is in the wiper motor gear box and rides against an adjustable cam plate. The position of the cam plate determines the park position of the wiper.
So.....
1. When you go from low speed or high speed to off, primary power is disconnected and parking power is applied to the park switch. With the contacts closed (non-park position of the wipers) the motor is run until the wiper reaches the park position and the switch opens, disconnecting power and stopping the wiper.
2. When you single wipe the wiper (pull the stalk to you and release it), power is applied through the primary power connection until you release the stalk. At that time, parking power is applied through the park switch until the wiper reaches the park position and the switch opens. Then the wiper stops.
3. When you use the intermittent mode, the ECU pulses the primary power relay in the WLU to move the wiper off the park position and close the park switch. Then primary power is disconnected and power is applied through the park switch until the wiper reaches the park position and the switch opens. Then the wiper stops.
Typical problems are:
A. Wiper stops immediately, wherever it is on the windshield, when primary power is disconnected.
This is usually caused by the inline fuse blowing (often because the wiper was stuck). If it has not blown then look for an open circuit between the fuse and the motor. If it blows repeatedly, look for a short in the wiring, a gummed up or bad wiper motor, or a bad park switch.
This can also be caused by a badly miss-adjusted park switch, such that the contacts in it are always open. Adjust the switch so that the contacts are closed when the wiper is not in the park position and open when it is.
B. Wiper parks, but in the wrong place.
This is usually caused by a bad or miss-adjusted park switch or the cam plate the switch rides against. The switch may not work correctly if it is loose such that the cam will not open and close the contacts. The cam plate may have shifted causing the wiper to stop in the wrong place; it can be re-positioned.
However, it might also be that the wiper itself is improperly installed on the motor output shaft. Check and adjust the switch and cam plate first. Then, if necessary, loosen the nut holding the wiper arm to the shaft, work the arm free from the conical shaft, position the blade on the windshield in the desired park position, and re-tighten the nut.
C. Wiper runs all the time.
The problem is that the park switch contacts are never opening. It is caused by a bad or miss-adjusted switch.
Note: pulling the in-line fuse out will allow you to manually park the wiper until you have the time to pull the top plate on the wiper motor and correct the problem.
If the wiper operation is erratic, and stops at different places on the windshield, the problem is often a faulty micro switch.
Access to the micro switch is easy. Picture 1 shows the wiper motor and the control box on the left off the motor. Picture is for a 1990 XJ40, Left Hand Drive.
Unclip the connector and move out of the way. Remove the 4 torx screws that hold the cover plate in place together. You will see the micro switch inside. Picture 2 shows the micro switch, The switch cover has been pried off for access to the contacts.
WARNING. There is 12 volts on the micro switch at all times. If you touch the switch contacts, the wiper may cycle, so be prepared. You may prefer to disconnect the battery ground before going any further.
The switch can often be cleaned, but if the contacts are really badly pitted, it should be replaced. Electronic stores are a source for a replacement.
To clean the switch, use contact cleaner and then a thin piece of cardboard. Draw the cardboard between the contacts while applying gentle pressure to close the contacts on the cardboard.
Test the wiper operation, and if OK, put everything back together.
The park switch is a rather standard microswitch and should be available from most electronic supply stores. Doug Bernard (dbernard@datecinc.com) offered the following part number and supplier information: Brand: OMRON Part#: V-16-1C24 (Second xref number is 3189RA2) It can also be purchased from the Jaguar dealer or parts supplier using the part # JLM-011332 (thanks Don Czapski czapski@sprynet.com) and costs less than $20 (USA).
13.3 - Seat Belts ( ,
)
All Passive Restraint motor and winch assemblies are warranted for life. (This may vary from country to country).
13.4 - Alternator etc. Belts ( ,
)
OE manufacturer is DAYCO a commonly available brand in the US.
13.6 - General Leather Care and Info. ( ,
)
CONNOLLY Brothers do sell touch-up dye but it's likely to cost you more than $30. In the UK, if you send a small section of the leather they supply the correct match. They also advertise a range of leather care products for cleaning etc. Their products used to be available from Hirsch's in Newark, N.J. who offered a similar colour matching service.
Over the years Jaguar have used less and less leather and more synthetics in the upholstery. Although the Daimler VDP has what is called a "full leather interior", comparison with the interior of a Bentley or an Aston Martin reveals a wide difference in interpretation of this phrase. Lower down the Jaguar range practically the only leather in the XJ40 is on the seat facings.
A major change in leather finishing occurred in the 1960's. Since then new lacquers composed of ketones, polymers and plasticisers have been used in leather finishing.Virtually all hides now are painted and surface protected.
The two main hide suppliers are Bridge of Weir and Connolly. Most car manufacturers claim to use Connolly hide probably because it's the best known name but I've seen both types in Jaguars.
The main difference between Bridge of Weir and Connolly is that Bridge of Weir is dipped in dye vats, then given a final finish, whilst Connolly is painted. The way to tell the difference is to look at the back of the hide. If the reverse is the same color as the front it's Bridge of Weir; if not it's Connolly. Connolly is just a brand name, not a type of hide and their hides are no better than an equal grade of any other hide.
13.6.1 - Routine Maintenance ( ,
)
Leather may be the ultimate upholstery material but it takes more maintenance than synthetics. It has three main enemies:-
1. Abrasion
2. Grease/tar based stains
3. Drying out
Modern leathers are finished with easy care finishes which means that a wipe over with a damp cloth is all that is normally necessary, followed by an application of Hide Food.
Cleaning is fundamental to both regular care and repairs. The process of washing helps keep the leather supple. For a thorough job, the seats need to come out but, if not, remember those electric motors and heating elements inside! The routine cleaning sequence is:-
1. wash with Saddle Soap and a damp cloth or a brush if heavily soiled
2. wipe off all soapy residue with a damp towel;
3. wait about 45 minutes then buff with a towel.
4. remove any grease spots with a naphtha-based cleaner followed immediately by washing.
5. allow to dry properly before proceeding.
Next, consider care of the leather. An Oil Dressing such as LEXOL can be used but not many of the leathers used since the 1960's are porous.
HIDE FOOD is a more effective treatment on today's leather. The term 'Hide Food' is probably misleading as it suggests a feeding action. Modern upholstery leather does not require to be fed and most hide foods are actually wax emulsions which leave the surface soft and supple whilst the thin protectivecoating of wax helps repel dirt.
If you're recolouring, and therefore removing/stripping the old lacquer finish, then a hide food is ideal to make it supple. These dressings are about 90% soap and 10% oil. Due to the limited breathability of many modern leathers, however, hide food's effect is limited to surface dressing on finished hide.
13.6.2 - Recolouring ( ,
)
This is cheap on materials but high on labour. The only satisfactory way to obtain an even depth of colour and finish is to treat the entire seat or (at minimum) the panel section. Spot repairs are always visible.
There are many Refinishing Kits on the market which fall into two types:-
1. water-based
2. lacquer/resin-based emulsions
Your Jaguar leather was originally finished with the second type which is what Connolly supply for refinishing. The lacquer/resin-based emulsions are also less likely to come off on your clothes in hot weather - not that anyone ever has problems with the air conditioning, of course!
Leather must be kept supple enough to take the refinishing process. With regard to renovation it is absolutely essential that the surface of the old leather is prepared properly by cleaning followed by degreasing with a solvent. This is absolutely essential if the new colour coat is to adhere properly. Spray application is preferable to hand application as an excess build up of lacquer emulsion caused by the latter can produce unevenness and a cracking effect at a later date.
1. Remove the seats.
2. Clean thoroughly with saddle soap.
3. Solvent degrease
4. Abrade with fine wet & dry
5. Apply the dye.
After thirty minutes drying time, the result should be a smooth, even, natural finish, with good color consistency, on all except the most worn areas. A second coat, applied three hours later will produce a consistent color and high-quality finish.
Depending on the seriousness of your problem, thorough cleaning and/or partial re-colour should restore the original finish.
13.7 - Engine bay cleaning ( Brett Gadzinsky,
)
We all like to see a clean engine compartment, especially in a Jaguar where the engine is something to proud of; it also makes working on the car a more pleasant experience. Unfortunately, as we all found out the hard way at one point or another, using degreaser and a lot of water comes at a price like the car not starting or running rough.
Generally, only a wet cap/wires/plug holes will stop the engine from starting in MOST cases.
NEVER wash the engine then park the car for a week; this is a VERY bad idea. The best way to clean your engine is to run it till it's warm, then spray something like Armorall or son of a gun all over everything except the oxy sensors, then go for a drive...one that gets the engine and engine bay full hot, to bake out any moisture.
Very bad idea to spray degreaser on the engine, and .....
* Not remove ALL the electrical connectors and relay sockets and spray wd40 on them,
* Not run the engine till its full hot for some time (go for a drive!),
* Not use silicone spray of some sort.
If you do degrease the engine with those sprays, and the spray sits inside of a relay socket, a connector, etc, it will
erode away the contacts over time.
Use the spray stuff the first time you clean the engine, and from then on use the leftover car wash soap and water.
With the wd40 and silicone spray, you can actually wash the engine while it's running, without it missing a beat. Both the wd40 and the silicone spray water proof everything. Dielectric grease is also good for most connectors, but wd40 sprays any water/moisture/dirt out of the connections and leaves a thin oil coating on all the connector gaskets...
|


