| ||||||||||||||||||||||||||||||||||||||
| ||||||||||||||||||||||||||||||||||||||
|
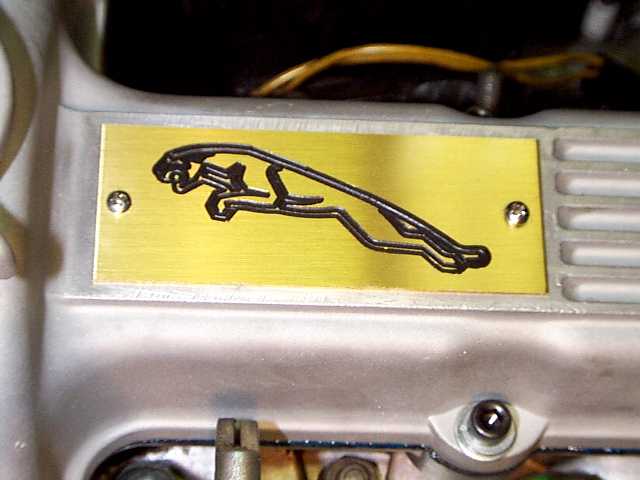
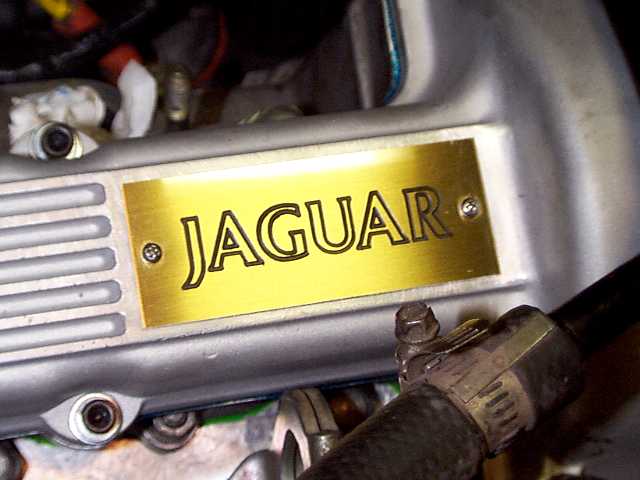
Cam Cover Decorations Kirby Palm always felt that the little decals Jaguar puts on its V12
cam covers are tacky. It's understandable why they went that route rather
than actually casting the insignia into the aluminum itself: the same engine
is used in Daimlers, so that would have required different cam covers.
This way, they only require different decals. Still, the decals seem inappropriate
for the engine or the car, and Palm set about making replacement decorations.
The result is shown in the photos below.
It was more difficult taking digital pictures of these cam cover plates than it was having them made. They are bright polished and clear-coated brass. If you don't get the light just right, you get a nasty glare off them and the picture is unrecognizable. On the other hand, if you get the lighting too perfect, you get such a uniform reflection that the plates no longer appear to be shiny brass but rather some dull yellow (got close to that with the upper pic). And even after quite a few attempts, these pics still don't do the plates justice. To obtain these plates, Palm carried his cam covers into Davis Trophies in Tallahassee, Florida and described what was needed. The guy behind the desk whipped open a book of "unleashed logos" and found one for Jaguar, which is similar to the logo below:  Palm then explained to the guy that he didn't like the idea of the puddy tat leaping towards the rear of the car, and therefore this logo was OK for the left cam cover but not the right. He asked if they were capable and legally permitted to break the logo into two bits so they could put the puddy tat on the left cover and the word on the right. The man actually made a phone call to somewhere to check that out, and reported that it was doable. The space available on the cam covers was carefully measured and it was decided the plates should be 1.5" x 3.75". There was an option of a standard brass plate or a "thick" plate, and Palm opted for the thick, about 1/16" thick. The engraving could not possibly be nearly as deep if the standard plates had been used, since these cuts are pretty deep. The order was processed and the plates picked up the following week. The total cost for the two plates was just under $30, including a $10 charge for "artwork manipulation" in separating the logo into separate entities. The engraving is called ERE, apparently done by computer, and comes with that black enamel in it. Will the enamel stand up to Jaguar underhood temperatures? Palm doesn't care; he'd almost as soon they had left the enamel off. If it starts to come off, he'll just go ahead and pry it all out. There are other ways Palm could have gone. He could have put the entire logo on the left cover, and then had them write "5.3 Litre V12" on the other -- or just "5.3 Litre", or "High Efficiency", or "OHC", or whatever else comes to mind. Another option apparently might have been to go to a "cast" plate instead of engraving, which might have been even prettier but Palm didn't find out about the possibility until after these plates were in hand. The plates might look better if they had a little bevel around the edge -- they are thick enough, although it's hard to tell from the pix -- but Davis Trophies says they don't do bevels, they'd have to be taken to a machine shop or something. Many Jaguar owners won't find it difficult to do something similar at their local trophy shop. However, for those who want to simply follow in Palm's footsteps, you might actually be able to order the exact same items from the exact same place. Davis Trophies is on the www at http://www.awards4u.com/. The sales order for these items includes a number, CC10075, which supposedly is the computer programming used to engrave the plates. With a little luck, you may be able to contact Davis Trophies via e-mail and ask them to run off a set and ship them to you; even though there's no convenient ordering scheme apparent on their web site, there is a mail-to address. The plates come with some tiny brass screws, like you'd expect to find on a trophy, along with tiny holes in the plates. Palm chose not to use these screws, and instead purchased some #4 stainless steel screws and enlarged the holes in the plate. Yes, the screws require two new holes in each cam cover, and you already have enough oil leaks to worry about. The cam cover is only about 1/8" thick at this point, so making a bottomed hole isn't even remotely possible. Palm didn't want to put a nut on the inside, since if that nut decided to fall off it would rattle around in the valvetrain and do all sorts of damage. So he insisted upon using screws that threaded into the aluminum itself. He used actual screws, like you'd use for wood, but that resulted in a bit of trouble; the aluminum is harder than you might think. He recommends using #4 machine screws and tapping the holes first. It might be possible to do this without even removing the cam covers from the engine, but that's not recommended since you wouldn't want to risk drill shavings getting into the valve train. To install, Palm applied a circle of Loctite 573 (left over from the tappet block installation) around each hole, set the plate in place, applied another circle of 573 around the hole in the plate to seal the head, and tightened it down. When the excess is wiped away, it looks fine, as the photos show. It doesn't leak. If you do wish to install nuts on the inside or just use long screws, there's plenty of room. The cam lobes don't get any closer than perhaps 14mm from the inside surface of the cover. The closest things are the cam bearing caps, especially the nuts holding them in place, but if the screws are located as shown they end up between the nuts and have considerable room. You might need to be more concerned if you want to use four screws, one in each corner of the plate. If you wish to do something totally different on your cam covers, take note: the pictures above were taken with the engine only partly assembled. When fully assembled, the fuel pressure regulators sit directly over this area of the cam covers and only clears them by about 3/16". Hence, whatever decoration is put on this area needs to be pretty flat. "Something's wrong with this picture. Jag V12 cam covers are black." True, but Palm changed that too. He took the cam covers to a machine shop and had them glass bead blasted to remove the paint. Then he polished the flat tops of the ribs and the surface under the decal/plate with some sandpaper wrapped around a block; it woulda looked better if the machine shop had skimmed the top on a milling machine, but Palm is too cheap to pay for that. The paint removal from the covers is a separate issue from the brass decorations, since you can do either one without doing the other; you can remove the paint and then reinstall stock Jaguar decals if you wish. "Those cam cover bolts don't look like mine, either." Originally, the cam covers were held on with some lousy "flange bolts", which are bolts with small heads with integral washers. When you upgrade to the later design Gortex sandwich gaskets, you're supposed to replace the bolts as well -- but the gaskets were expensive enough, so Palm decided to look elsewhere for bolts. He bought a box of 100 alloy steel socket head cap screws for less than the Jag bolts would have cost, and has 70 or so left over for future projects. He also bought 1/4" lock washers and 3/16" flat washers to go under the heads for less than $2 total. They look fine, and they are certainly strong enough; alloy steel is stronger than Grade 8. "That is one sorry connection for an A/C hose in the foreground."
Yeah, several people have commented that the idea of using a worm screw
hose clamp on a freon line was not good, and apparently Jaguar went to
properly crimped connections later. When Palm first bought this car in
the late 80's, he was working on the car and leaned on that hose a bit
and it went "sssss", so he tightened that clamp down without moving it
(it was quite loose, in fact) and hasn't had any further trouble with it
-- knock on wood.
|
|
| ||
 |
Improve your Jag-lovers experience with the Mozilla FireFox Browser!
ęJag-loversTM Ltd / JagWEBTM 1993 - 2024 All rights reserved. Jag-lovers is supported by JagWEBTM For Terms of Use and General Rules see our Disclaimer Use of the Jag-lovers logo or trademark name on sites other than Jag-lovers itself in a manner implying endorsement of commercial activities whatsoever is prohibited. Sections of this Web Site may publish members and visitors comments, opinion and photographs/images - Jag-lovers Ltd does not assume or have any responsibility or any liability for members comments or opinions, nor does it claim ownership or copyright of any material that belongs to the original poster including images. The word 'Jaguar' and the leaping cat device, whether used separately or in combination, are registered trademarks and are the property of Jaguar Cars, England. Some images may also be ę Jaguar Cars. Mirroring or downloading of this site or the publication of material or any extracts therefrom in original or altered form from these pages onto other sites (including reproduction by any other Jaguar enthusiast sites) without express permission violates Jag-lovers Ltd copyright and is prohibited |
|