|
2.4 - Inlet Manifold Removal ( Paul Stow,
December 1, 2001
)
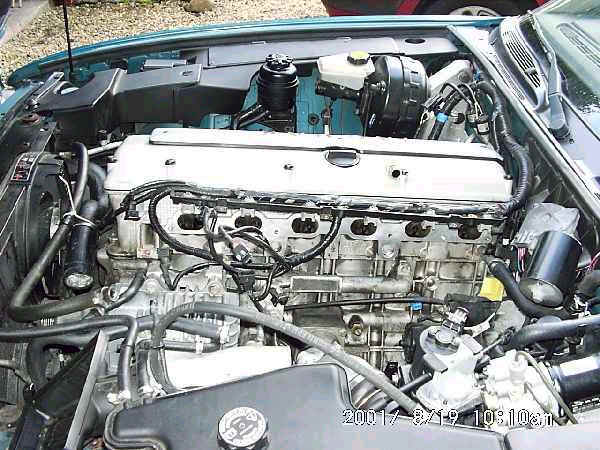
Inlet Manifold removed
|
The procedure for this on normally aspirated models is slightly different to that for the XJR, as detailed below. However, the overall sequencing of tasks is essentially the same.
The manifold is a single casting with, in the case of the XJR, an intercooler welded onto the inlet side. The intercooler inlet is fed by the supercharger, which in turn is fed from the throttle body mounted underneath the inlet manifold. Incoming air is routed from the air filter over the top and down the rear side of the intercooler to reach the throttle.
Removal and refitting of the manifold is somewhat fiddly, but not complex. Make sure to note the position of pipes and electrical connections as they are removed, but Jaguar has helped here by ensuring most pipes and electrical connectors are shaped in such a way that they can only go back one way.
Begin by removing the trim cover from above the fuel injectors, which is held in place by three torx head bolts. Working along the line of injectors, squeeze the metal clip on the electrical connector to each injector and pull upward to release it. You will need to gently pull up on the plastic mounting which holds all the connectors in order to stop them clicking back in again. To avoid bending the mounting bar too much, you will probably need to release the next connector before the previous one can be fully freed.
Eventually all the connectors are released and can be moved away - it is possible to route the wiring over the front corner of the engine and so gain a bit more working space, but it is not necessary to trace and disconnect the injector wiring.
Slowly unbolt the fuel inlet and return pipes at the front of the injector rail / pressure valve assembly, allowing any remaining fuel pressure to dissipate and using a rag to mop up any spillage.
Disconnect the air intake hose. Again to make more space, disconnect the MAF connector ( halfway between air filter and manifold ) and remove the whole air intake trunking from the air filter end. Also disconnect the cam cover breather tube, which is routed between branches 5 and 6 of the manifold.
On the XJR, disconnect and remove the intercooler air inlet hose and unbolt the associated elbow. The plastic line going into this is for braking vacuum and is reluctant to come out of the elbow, so is best left in place. The elbow can be parked out of the way above the heater pump and hoses. The intercooler coolant hoses are at a fairly high point of the system, but it's less messy to drain at least some coolant out of the system before removing them. Also at this stage, unbolt the intercooler supporting bracket and associated dipstick tube bracket.
From under the car, disconnect the air duct feeding the throttle body from the rear side of the manifold assembly. Note that it is not easy to remove the rear ducting section from the manifold. Disconnect the breather pipe attached to the rear side ducting.
The manifold is attached to the head by nuts above and bolts between the inlet ports. Undo the nuts, which is easy, and undo the bolts, which is fiddly. You will need slim fingers or a pair of long nose pliers to remove the bolts when they are loose. Remove the connector support bracket from the rearmost mounting stud.
You may need to rock the manifold a little to free it, but it should now be possible to move it backward such that it is resting on the ends of the mounting studs. This gives you the extra clearance and movement needed to disconnect the wires routed down between ports 2 and 3 of the manifold.
On the XJR, these connectors link to the oil pressure sensor on the block, anti-knock sensor ( I think! ) on the block, throttle position sensor on the throttle body, Idle Speed Control Valve also on the throttle body, and Intake Air Temperature sensor on the underside of the intercooler.
Thread the electrical connectors between the manifold ports and out of the way. It is now possible to gently lift the manifold away, checking carefully for any forgotten attached pipes or cables. Beware of remaining coolant in the intercooler on XJR models.
Check the condition of the gasket. It can be reused if there are no potential leaks, but it's not expensive to replace. Ensure head and manifold surfaces are clean before refitting.
Refitting is the reversal of removal. The anti-knock sensor is tricky to get on, but will eventually give in. There are two similar style connectors, but one has a long lead and one a short lead, so you can't really mix them up.
Loosely attached the manifold using front and rear mounting studs, not forgetting the connector mounting bracket at the rear, whilst attaching the breather hoses, mounting strut, dipstick bracket and air ducting. Use long-nose pliers to get the bolts in between the inlet ports and get them all started before progressively beginning to tighten.
On XJR's, attached the coolant hoses and refill the system. For all models, replace the MAF and associated ducting, fuel send and return lines, the fuel injector connectors and their cover.
Check again carefully that all pipes and connectors have been replaced before starting the engine.
|


