|
6.6.1 - Adding a CD Player, pre wired 1990+ ( Martin Briscoe / Christopher Pavlik,
December 3, 2001
)
Alpine CD Changer mounted in the boot
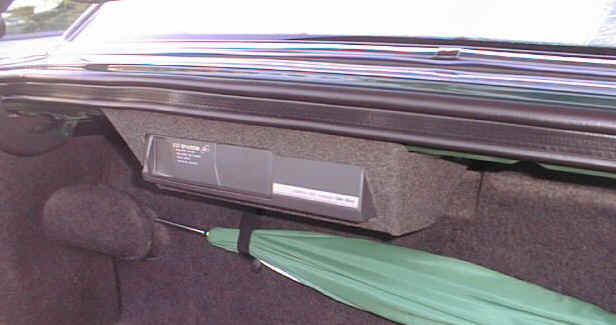
Cover some cardboard with matching material for factory look
|
Which changer to use ?
Cars which have the CD button on the radio are pre wired to take a changer in the trunk. Those without the CD button, 1986 - 1990, can use an "RF Modulated" CD Changer that plays through the radio is. 98 and up X308 must used a Jaguar supplied changer which comes with a covered panel.
Cars which have the (MS Bus) 8 pin DIN lead can accept the Alpine CHMS 620 without any problems, it is a direct plug-in and works well most listers have gone for this (Alpine apparently make the Changer supplied by Jaguar). The Alpine changer can be purchased from electronic stores for well under $ 300.
Probably most other Alpines with this plug will work too as Jos Raven reports that an Alpine 5960 & a 5952 worked in his '92 xj40 and his '95 x300 without an adapter
Cars that do not have the MS Bus require an adaptor, when in doubt look for the lead in the trunk and check to see if it is the 8 pin DIN. The cable has been found in a number of places :
1. In the forward right corner of the trunk, behind the trim panel.
2. Behind the front trim on the left hand side.
3. Coiled up behind the arial.
4. Behind the spare wheel
If your car didn't come whith the 8 pin conenctor, an ALPIL adapter is needed to get the Alpine CHM-S620 to work.
Jos reported that he needed the 4913 adaptor for connecting the 5962 & 5952 Alpines to the Alpine TDM-7531R Radio. This type has the 8-pin Din socket but has 2 separate RCA audio inputs as well which is is where the adaptor comes in.The CD style radios have problems with the frequency displays going bad, keep them dry ! They also seem to have problems blowing out parts and chips. The CD player in the trunk can be replaced by an Alpine CHM 620s, or that can be fit if you did not get one with the car. See 6.6.1 below
Mounting
The brackets that come with the Alpine don't match with the mounting holes provided in the underside of the trunk lip above the battery (factory units mount there).
Options include:
1. Mount vertically (with the cartridge door facing up) on the 'shelf' at the right side of the trunk.
2. Mount directly above the battery, this would keep it somewhat protected from being banged about by luggage or doused with rain when the trunk is opened
3. Mount on one of the shelves using velcro - advantages: quick to do & makes the changer easy to remove when parked in high risk areas, my car has the tool box under the lid so no room at the top. disadvantages: more likely to get knocked, doesnt look so good.
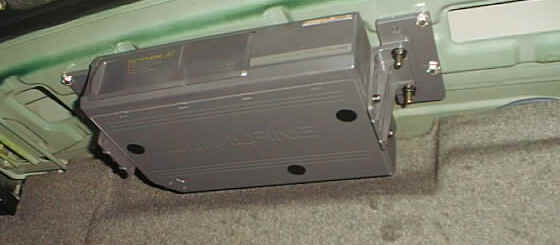
4. and probably the best: - Top of trunk. advantages - solid fixing, rain wont get on it, unlikely to be bumped. disadvantages:- more work, people with tool kits here wont have room.
4a. Jos shows in the picture opposite that the 'Top of trunk' fixing need not be ruled out by the presence of a toolbox, as the changer can be mounted below this.
Mounting at the top of the trunk (by Christopher Pavlik)
I put all of the mounting hardware (including "L" brackets and plastic mounting plates) together attached it to the changer. I then removed the felt like insulation from under the boot lid. to do this, I removed the spare tire (which needed to come out anyway so I could drill the pilot holes).
Holding the Changer up in the position that I wanted it in, I used a fine point magic marker (A Sharpie) to mark where I wanted the holes. At this point I inserted my finger between the panels to make sure where I was going to drill would not come through the exterior panels on the car or interfere with anything else. All was good, so I drilled pilot holes for the sheet metal mounting screws. As I was mounting the plastic mounting plates, I noticed the one side partially covered one of the holes with a beveled edge. this would have caused the plastic mounting plate to sit on an angle when I screwed it down, so I marked the plastic plate with a magic marker.
I then used a grinder to shave some plastic off the edge on the mounting plate (enough so it fit flush against the metal. Next, I screwed the plastic mounting plates on and put the insulation back up (after cutting holes so the mounting crews would go through). mounted the "L" brackets attached to the CD changer next. Plugged in the DIN Connector put back the tire and all the rest of the "junk" I keep in the boot normally.
After thinking about it, I could have gotten a piece of 1/4 inch lexan or some other plastic, and mounted the Alpine hardware to this and then used the factory mounting holes on the lexan. I am happy with the way it turned out though and it looks very professionally done.
|


