| ||||||||||||||||||||||||||||||||||||||
| ||||||||||||||||||||||||||||||||||||||
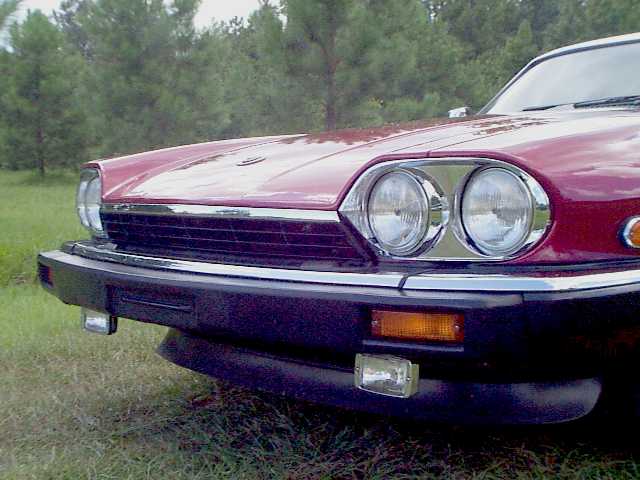
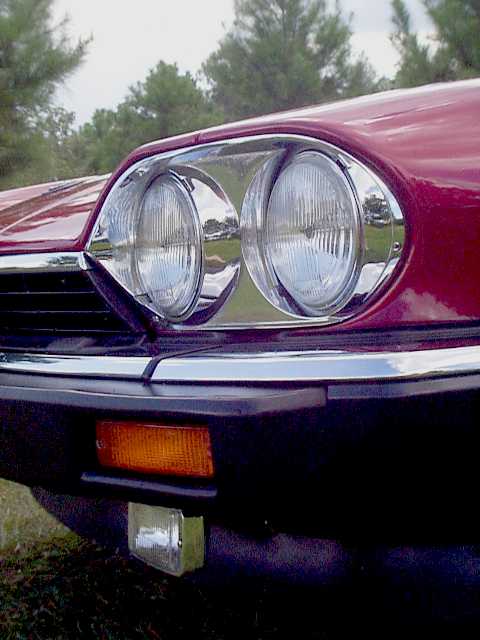
1992-On Upper Radiator GrilleFor 1992, Jaguar redesigned the front end of the US-spec XJ-S (now officially renamed the XJS) with a new upper radiator grille and single unit oblong headlight assemblies. The new grille and the new headlights bulged somewhat from the front of the car, changing the entire profile of the nose. With only minor bracket work, the 1992-on upper radiator grille (BEC-10966) can be retrofitted to the earlier cars. This picture shows what it looks like on Kirby Palm's '83.
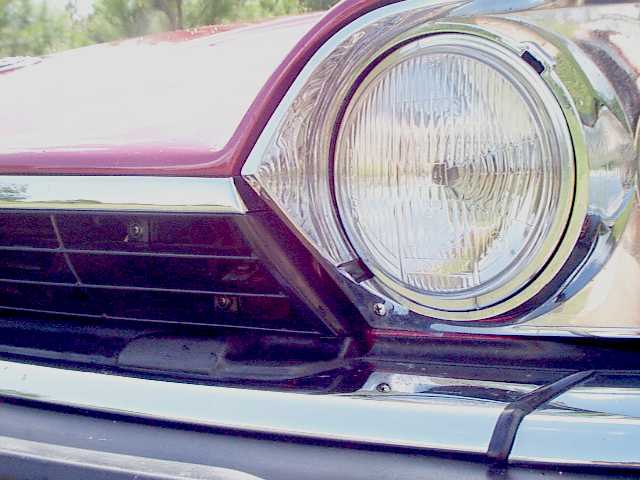
Not bad, doncha think? As opposed to the earlier design, this grille is structurally a well-designed part. The black plastic horizontal ribs are really substantial and look as though they could survive a bird hit. The chrome strip across the upper edge is actually a piece of metal attached to the plastic grille. And for all this, the part sells for about half what the earlier design grille costs. The only "fit" issue relates to the fact that the later oblong headlights bulge while the four round headlights do not. This leaves the ends of the grille exposed, where they would normally be covered by the bulging headlights. Here's what the area looks like up close:
As you can see, if you look close enough it doesn't really look "right" -- but upon close inspection, the original chrome plastic grille doesn't look "right" here either! In fact, it could be argued that the 1992-on grille actually looks like it fits better on the earlier car than the grille that was designed to go on it. It almost looks like Jaguar designed this grille with retrofit in mind, since they made the chrome strip wrap around the corner and provided a flat black surface on the side where it would never show on the 1992-on car.
For those interested in making this upgrade, the following are a few guidelines on the work involved. The 1992-on grille does not mount the same way as the earlier grille. The earlier grille had four screws installed vertically upwards into plastic nuts in the hood. There are no corresponding places for screws in the later grille. In fact, two of these four plastic nuts interfere with installation of the later grille. Simple solution: pop them out of their holes and into your junk box. The later grille is mounted with five screws, all pointing rearward. Obviously, you should use black trim screws -- which fortunately are commonly available in auto parts stores for jobs like this. They have a built-in washer, good idea when tightening down on plastic. Two of these screws, at the bottom at the ends of the grille, look like
they might go into the same holes a pair of screws on the earlier grille
screwed into -- but they don't. The brackets need to be relocated
forward a bit, or the bottom of the later grille will be pulled too far
rearward and a gap will open between the top of the grille and the front
of the hood. You can fix this
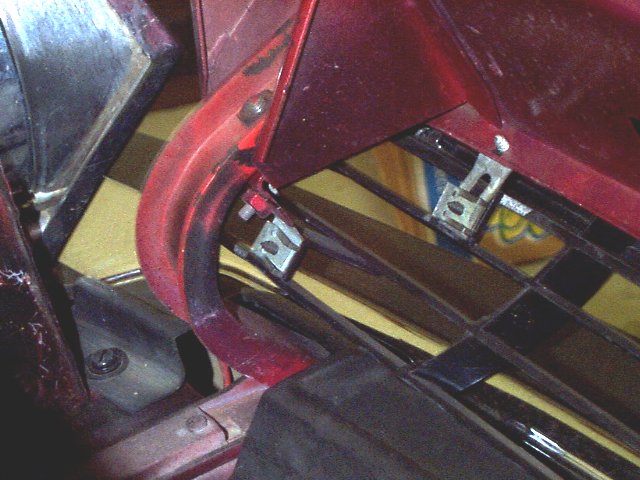
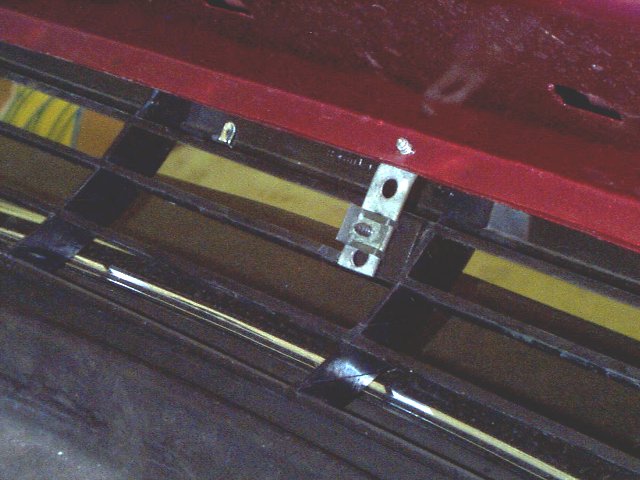
There's nothing there to screw the other three screws into, so you must provide something. Fortunately, this is easy; just cut and bend some steel straps and screw them to the lip along the bottom edge of the hood behind the grille. You don't even need to do a neat job, because none of this shows from outside the car -- you can only see these parts with the hood open. A word of warning, though: when you're drilling the hole in the lip of the hood for the screw, be careful when you break through that the chuck on the drill doesn't hit the nose of the hood. If you've used steel strapping with no holes you'll need to drill a hole, but I used perforated steel strapping so I just made sure one of the existing holes would work. Slide a clip nut (available at the same place as the black nuts) over the hole in each strap and install the grille. Here are a couple of pictures of Palm's '83 from inside the engine compartment with the hood up. First, the pair of mounting screws at one end:
That lower bracket is attached to the hood support the same way an original bracket was, but this one is shaped a little differently to position the attachment perhaps a half inch farther forward on the car. The upper bracket is screwed to the lip on the hood with a single screw, and the entire contraption -- bracket and screw -- is hidden behind the grille itself. You can see these same two screws from the front in the second picture from the top of this page. The second picture is of the center bracket -- which by this point should be no surprise:
You'll notice that the upper brackets aren't straight; they've each had a bit of a crook bent in them to hold the grille in the correct place so the chrome strip lines up properly with the edge of the hood at the front. One of the nice things about this mounting scheme is that it's hard to go wrong. If you get all done and realize that the grille really isn't lined up right, you can just fab new brackets out of some more steel strapping and try again. If it takes you more than an hour to install this grille, you're milkin' the job. That little tang at the upper left in this last picture is one of the
tabs that holds the chromed steel strip to the plastic grille.
|
|
| ||
 |
Improve your Jag-lovers experience with the Mozilla FireFox Browser!
©Jag-loversTM Ltd / JagWEBTM 1993 - 2024 All rights reserved. Jag-lovers is supported by JagWEBTM For Terms of Use and General Rules see our Disclaimer Use of the Jag-lovers logo or trademark name on sites other than Jag-lovers itself in a manner implying endorsement of commercial activities whatsoever is prohibited. Sections of this Web Site may publish members and visitors comments, opinion and photographs/images - Jag-lovers Ltd does not assume or have any responsibility or any liability for members comments or opinions, nor does it claim ownership or copyright of any material that belongs to the original poster including images. The word 'Jaguar' and the leaping cat device, whether used separately or in combination, are registered trademarks and are the property of Jaguar Cars, England. Some images may also be © Jaguar Cars. Mirroring or downloading of this site or the publication of material or any extracts therefrom in original or altered form from these pages onto other sites (including reproduction by any other Jaguar enthusiast sites) without express permission violates Jag-lovers Ltd copyright and is prohibited |
|